Category: Food & Drink

Auto Added by WPeMatico

  • The Simplest Way to Produce Tasty Chocolates

    The Simplest Way to Produce Tasty Chocolates

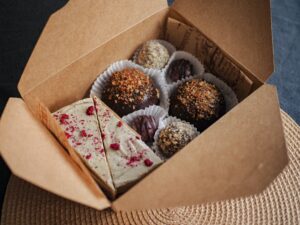
    The Recipe: Homemade Chocolate Truffles – The Simplest Way to Produce Tasty Chocolates

    The Simplest Way to Produce Tasty Chocolates: You may easily add a sophisticated flavour to your parties and gatherings by making your truffles. Furthermore, you can easily modify your truffles to your guests’ preferences and dietary concerns. This post will provide you with a quick and simple recipe for making handmade chocolate truffles.

    To make these delectable truffles, you’ll need a few essential and inexpensive ingredients. Furthermore, the homemade truffles recipe is a terrific way to use leftover chocolate.

    So, are you up for the task? Then let’s get this party started!

    What exactly is a truffle?

    A truffle is a sweet and sometimes savoury Italian dessert prepared from various ingredients. They are available in a range of shapes and sizes. Truffles are thought to have originated in Nice, France, but there is little evidence to back this up.

    We know that the Italians have a long history with truffles and have been producing them for centuries.

    Truffles can be highly pricey, depending on the kind. As a result, knowing how to produce them yourself can help you save money.

    The good news is that producing truffles is both inexpensive and straightforward. This post will teach you how to make your chocolate truffles.

    the simplest way to produce tasty chocolates

    How to Make Homemade Chocolate Truffles

    This instruction is for you if you want to make homemade chocolate truffles at home. Making chocolate truffles is a straightforward process. You only need a few simple components and a little knowledge of cooking. You are now prepared to begin the party!

    To begin, prepare a chocolate sauce. Here’s how to go about it:

    Combine two tablespoons of cocoa powder in a small bowl.

    Add one ounce of melted butter at a time to the cocoa powder.

    Make a smooth mixture with butter and chocolate powder.

    Stir in one gramme of melted butter until the paste is smooth.

    Other flavours, like vanilla and peppermint, can be added if desired. Set aside the sauce while you make the chocolate mixture. In a medium saucepan, combine one tablespoon of butter and one ounce of cocoa powder. Cook the butter and cocoa powder together over low heat until the cocoa powder becomes aromatic. This process will take approximately three minutes. When the cocoa has grown fragrant, remove the saucepan from the heat and put it aside for a minute.

    Pour in one cup of sugar and stir until dissolved. Add three-quarters of a cup of crème fraîche to the mixture in the blender. In the food processor, puree the sauce until entirely smooth. Set the sauce aside to cool. Once the sauce has cooled, stir in two ounces of crumbled semisweet chocolate and two tablespoons of instant espresso powder. In a mixing dish, combine the ingredients and stir until the coffee and chocolate are evenly distributed. While you mould the truffle balls, set aside the truffle mixture.

    Set aside the chocolate mixture in a basin to cool. After the mixture has cooled, stir in two tablespoons of unflavored gelatin until the gelatin is equally distributed. Continue to combine the ingredients until they are smooth. Form the mixture into 1.5-inch balls and set them aside on wax paper. Place the truffles in the refrigerator for an hour to cold. Meanwhile, you can prepare the chocolate coating.

    Ingredients required

    In order to prepare these delightful chocolates, you’ll need the ingredients listed below.

    Two c. semisweet chocolate chips

    1/2 cup melted butter

    1 pound whipped cream

    1 tbsp powdered sugar

    a quarter teaspoon of vanilla extract

    three tsp unflavored gelatin

    Required equipment

    To create these homemade chocolate truffles, you’ll need the following supplies.

    a big mixing bowl

    frying pan

    Blender

    Paper made with wax

    chocolate truffles

    Making Homemade Chocolate Truffles

    Here are the easy methods for making homemade chocolate truffles at home.

    Make the chocolate sauce first. Combine two tablespoons of chocolate powder and a pint of melted butter in a small mixing basin. Make a smooth mixture with butter and chocolate powder. Now, whisk in a pint of melted butter until the paste is smooth. Set aside the sauce while you make the chocolate mixture.

    In a medium saucepan, combine one tablespoon of butter and one ounce of cocoa powder. Cook the butter and cocoa powder together over low heat until the cocoa powder becomes aromatic. This process will take approximately three minutes.

    When the chocolate begins to smell aromatic, remove the pot from the heat and set it aside for a minute to cool.

    Pour in one cup of sugar and whisk until the sugar is completely dissolved. Pour three-quarters of a cup of crème fraîche into the mixture in the blender and process until smooth. Smoothing out a sauce that is not too thick can be accomplished with the help of a food processor.

    After you take it from the heat, store it in a cold place for the time being until it has completely cooled. Stir in two ounces of crumbled semisweet chocolate and two tablespoons of instant espresso powder until everything is well blended after the sauce has cooled.

    All of the ingredients should be combined in a large mixing bowl and stirred until the coffee and chocolate are uniformly distributed. Immediately after creating the truffle balls, remove the truffle mixture from the oven.

    Set the chocolate mixture to one side in a large mixing bowl to cool. Allowing the mixture to cool completely, whisk in two teaspoons of unflavored gelatin until it is evenly distributed. Using a large mixing basin, thoroughly combine all of the ingredients until smooth.

    Form the dough into 1.5-inch balls and place them on a baking sheet that has been prepared with parchment paper. Refrigerate the truffles for an hour to allow the flavours to blend. Prepare the chocolate coating while the cookies are cooling.

    Conclusion

    Making homemade chocolate truffles is a simple and inexpensive process. You only need a few key components and a little know-how to get started.

    Furthermore, you may easily tailor your homemade truffles to your guests’ preferences and dietary requirements. So, if you’re seeking a simple method to add refinement and delectability to your parties and celebrations, homemade truffles are the ideal solution.

    The post The Simplest Way to Produce Tasty Chocolates appeared first on https://gqcentral.co.uk

  • What’s The Deal With Bread And Ducks?

    What’s The Deal With Bread And Ducks?

    What’s The Deal With Bread And Ducks?

    What’s the Deal with Bread and Ducks?: Every year, more than three-quarters of the population tosses their bread crumbs into canals, rivers, reservoirs, and lakes. Learn why it’s vital that we all feed ducks differently.

    5 Reasons Bread Isn’t Healthy

    Ducks need a varied diet to keep healthy. Bread has minimal nutritional value and fills the duck’s stomach, prompting it to stop seeking items it would normally eat, potentially leading to starvation.

    Uneaten, soggy bread can generate a buildup of unfavourable nutrients in the water, resulting in further algae growth, disease, and pests such as rats.

    When the bread is thrown into a canal or river, it can cause unnatural overcrowding of bird populations since birds flock to the identical place in search of the starchy treat.

    Too many ducks or waterfowl in the same location can stress the birds and devastate their natural environment.

    This causes an abundance of bird droppings, which are filthy and slippery, and can also have an impact on water quality and clog streams with dangerous algae.

    whats the deal with bread and ducks

    What Do Ducks Consume Exactly?

    There are six different things to feed ducks.

    It is the responsibility of wildlife conservationists to improve the health of our country’s birds. Do you know what to feed ducks for their health’s sake?

    1. Mature Corn

    Ducks, it turns out, are suckers for sweet corn. It makes no difference whether it’s canned, frozen, or fresh. Of course, you should start by removing the corn from the can.

    2. Romaine lettuce

    We’re all guilty of throwing out a lot of lettuce, particularly packaged lettuce. Instead of tossing it away, shred it up and feed it to the ducks in your neighbourhood. Arugula, kale, and iceberg lettuce are all good choices.

    3. Frozen Peas

    They do not need to be cooked, but they must be thawed beforehand.

    4. Oatmeal

    Pancakes, oats, and even fast oatmeal are favourites of ducks.

    5. Cultivate

    Whether you buy birdseed or seeds from the fruit and nut section of the store, ducks will appreciate these nutritious nibbles.

    catnip-

    6th. Rice

    After a snack, ducks will be overjoyed to receive a handful of leftover rice. Don’t forget to keep the crispy duck to yourself. Cooked or uncooked rice can be used.

    Mallard

    The mallard is without a doubt the most ubiquitous duck in the world, and it is a familiar and enjoyable sight on our canals and rivers.

    Even if they call it a “duck,” almost every British child has heard of a mallard. Because of our familiarity with it, we may have underestimated this charming, adaptable, and, most importantly, resilient bird.

    The mallard has been domesticated for about 2,000 years and is now so ubiquitous in the United Kingdom that it would be difficult to find a river or village pond that did not include a mallard population.

    The hardy ducks can colonise any wetland, including drainage dykes and fast-flowing rivers. This is primarily due to the mallard’s extraordinary ability to adapt to almost any food source. Plants, berries, insects, crabs, and even potatoes are eaten by this bird.

    You may be wondering where all the colourful “drakes” (male mallards) have gone in the months following the breeding season. Ducks are remarkable in that they moult all of their flying feathers at the same time, leaving them vulnerable to predators.

    Evolution has provided some protection by replacing the drakes’ light-coloured feathers with darker brown feathers, giving them a more feminine appearance.

    Summary

    So, is it okay to feed bread to ducks? Other alternative feeds, on the other hand, will result in less crowding and a less stressful condition for ducks and swans. A healthy duck is a happy duck.

    The post What’s The Deal With Bread And Ducks? appeared first on https://gqcentral.co.uk

  • Herbs to Always Have on Hand

    Herbs to Always Have on Hand

    Herbs to Always Have on Hand

    Herbs to Always Have on Hand: Herbs can be used in a variety of ways to improve health and fitness. Some, on the other hand, are significantly more effective and should be kept in the house at all times. This is a list of herbs that are good for your general health and may be cultivated in your own yard and cooked with.

    Chamomile

    Chamomile is a very versatile and useful herb to have on hand. It’s an excellent addition to your first-aid kit as well as your kitchen cabinet. The best part is that it is easy to start from seed. It is well-known for its ability to alleviate anxiety and concern, but it also helps with stuffiness, constipation, upset stomachs, and migraines.

    herbs to always have on hand

    It can be used to treat pain, digestive problems, and sleep disorders. Steep dried chamomile flowers in boiling water for 5 minutes to make tea. To get a good night’s sleep, try it before going to bed. Chamomile can also be used as a supplement in pill form.

    Chamomile is a soothing herb that can be used to treat arthritis, haemorrhoids, stomach problems, and cuts and wounds.

    Painful menstrual periods are a particular problem for women. Chamomile has been shown to aid with this, which is fantastic news for many ladies who suffer from it on a monthly basis. Osteoporosis is another issue that women encounter, particularly after their periods have ceased. This is the point at which the bones become brittle and easily fractured. Chamomile has been shown to help prevent this due to its influence on the hormone oestrogen. Chamomile is unquestionably a woman’s best friend.

    Lavender

    Lavender is another herb that may help you sleep better, especially if you have insomnia. It aids in the relaxation of both the mind and the body, resulting in a better mood. Simply feeling less anxious and more peaceful can help you sleep better. Lavender can be used to relieve pain and muscle tension, especially after strenuous activity or exercise, and inhaling lavender blooms is said to have a soothing effect on people. So, before you go to bed tonight, plant a few stems beneath your pillow or beside your bed and take several deep breaths to savour the lovely aroma.

    This is yet another plant that is simple to grow. It makes a wonderful border with flowers that attract bees and butterflies. You will then have a ready supply of organic food at all times.

    St. John’s Wort is a herb.

    This plant is used to treat a variety of mental health issues, such as depression, anxiety, and stress. It is also used to alleviate insomnia and nerve pain. Although it is extremely effective in improving mental health, it should not be used in conjunction with prescribed medications. This is because it can interact with it and have undesirable effects.

    Turmeric

    This herb has strong anti-inflammatory properties. As a result, it may help to alleviate arthritic pain. It has the ability to relax the stomach and aid in the treatment of digestive ailments such as indigestion and ulcers. It can also help with depression treatment because it increases brain function. Curcumin, a molecule contained in turmeric, has also been demonstrated to aid in the death of cancer cells (6), which is yet another reason to keep turmeric on hand in the kitchen.

    It’s crucial to note that not all herbs are useful in cancer treatment. Avoid using St John’s Wort or Ginkgo Biloba if you are already being treated. Because they cause cancer drugs to leave the body too quickly, they become useless.

    Ginger

    Ginger is a fantastic addition to any dish. It not only tastes good and improves the flavour of foods, but it also has healing properties. Both ginger and turmeric have anti-cancer properties. If you have a family history of cancer, use ginger and turmeric in many of your meals to help protect yourself from this terrible disease. Ginger, like turmeric, can be used to a range of foods, such as curries, soups, stews, and smoothies.

    Ginger has been shown to help with nausea, vomiting, motion sickness, morning sickness (9) and even arthritis. It can also help lower blood pressure and cholesterol levels (10). If you have indigestion, ginger can help you feel better. If this doesn’t persuade you to use ginger on a regular basis, I’m not sure what will.

    Ginkgo Biloba (Ginkgo Biloba) (Ginkgo Biloba)

    This plant contains a lot of antioxidants and anti-inflammatory chemicals, so it can help you avoid heart disease, arthritis, and even cancer. Because it is accessible as a supplement, it makes sense to take it on a daily basis. It has been shown to be effective in the prevention of Alzheimer’s disease. Alzheimer’s disease, as well as melancholy, anxiety, and attention deficit hyperactivity disorder (ADD/ADHD), are all linked to brain health. Ginkgo biloba boosts circulation, especially in the brain and heart. As a result, it goes without saying that this powerful herb can assist you in staying mentally sharp.

    Rosemary

    Rosemary is yet another herb that grows easily in the garden and tastes great in meals. It is useful in the treatment of memory loss and has even been shown to postpone the onset of dementia. Rosemary can aid with headaches, especially migraines, as well as asthma and bronchitis. It can also help women with menstruation cramps. It is also useful for treating depression. If you have diabetes or are on blood thinners, avoid using rosemary oil as it may make them less effective.

    Liquorice Root

    As a child, I used to enjoy chewing on a piece of liquorice root, not realising how helpful it was to my health. Liquorice has anti-inflammatory properties and can aid in the treatment of intestinal infections, indigestion, and heartburn. It can also help you breathe if you have a cough or a cold. All of these characteristics derive from its anti-inflammatory and bacteria-killing qualities. Furthermore, it is effective at reducing skin inflammation, which aids in the alleviation of acne, psoriasis, and eczema symptoms.

    Chewing liquorice root as a youngster obviously helped my oral health, as I have very few fillings and studies show it prevents cavities. I’m on my way to the health food store right now!

    Lemon Balm

    This herb is well-known for its calming qualities and can help alleviate anxiety, stress, insomnia, migraines, and other tension-related ailments. It also has antiviral effects. It grows easily in the garden and may be used in cooking as well as to make delicious tea.

    Peppermint

    This plant can help with gastrointestinal problems such as nausea, vomiting, diarrhoea, and constipation (23). It also aids in the relief of achy muscles and tension headaches. This herb can simply be replanted in your garden. It can be prepared into a tea by steeping it in hot water, or it can be purchased as a supplement or essential oil. When you’re feeling congested, mix the oil with hot water and inhale it to help you breathe. Peppermint is also a fantastic addition to your first-aid kit for treating hay fever symptoms. It reduces the allergic reaction, which causes sneezing and itching eyes.

    These eleven herbs will keep you healthy if you use them on a daily basis. The bulk of them can be consumed, while some can be purchased as a supplement or used to make tea. Why not give one of them a try and see if it helps you feel better?


    The post Herbs to Always Have on Hand appeared first on https://gqcentral.co.uk

  • What Does One Do at A Winery in Long Island, New York?

    What Does One Do at A Winery in Long Island, New York?

    A visit to a vineyard is a pleasurable experience that will undoubtedly leave you with a plethora of unanswered questions. The majority of wineries require appointments, so it’s critical to schedule a visit in advance. Certain vineyards provide online booking or scheduling via email. Make certain you contact ahead to avoid conflicts or delays. Inquire about special events, packages, and additional services. If you have a question, formulate it in advance and address it. Apart from wine tasting, you’ll explore the vineyards and stroll among the rows of the season’s harvest. You may even be invited to pluck a few grapes and enjoy them fresh from the vine, depending on the time of year in New York. Following your tour to the vineyard, you’ll make your way inside to the winery’s production facility.

    Why Do People Go on Wine Tours in Long Island, New York?

    Wine tours are an excellent opportunity to immerse yourself in the culture of a particular location. While wine fans may appear to be a tiny group, these outings are both instructive and entertaining. Visitors may learn about the indigenous grape varietals and the many phases involved in the winemaking process. Additionally, they may tour numerous vineyards and learn about the many grape varieties that thrive in the area. Following the tour, guests may sample four to six different wines and purchase souvenirs. While wine tours may appear inexpensive, it is critical to establish a budget for the trip. You never know when you’ll feel the need to make a buy, so it’s always prudent to plan ahead.

    Numerous vineyards provide tours that include samples and a visit to the gift store. Several vineyards have live music and gourmet cuisine. Certain tour operators in New York City include food as part of their tour packages, and many offer suggestions for local eateries. Proper nutrition is a necessary component of the wine tasting experience. Having the opportunity to taste a variety of wines can help you feel more secure about your selections. Additionally, you may obtain advice on the best wines to drink while on tour.

    What To Wear on A Wine Tour in Long Island, New York?

    long island wine tours

    Perhaps you’re unsure about what to dress on your wine country vacation. To begin, keep in mind that you do not want to overdress — you want to wear exactly the proper amount of clothing. Because a vineyard is quite different from a nightclub, you’ll want to avoid wearing excessive makeup, perfumes, or lotions, as they might interfere with the wine’s flavor. Additionally, you should avoid wearing anything too heavy, since the humidity might cause your skin to perspire excessively. If necessary, you can also wear dark, breathable pants or shorts.

    Depending on the season, you’ll want to layer on comfort. Choosing an outfit with many layers not only adds sophistication, but also allows for easy transitions between venues. Avoid wearing flip-flops or leggings, as they do not look appropriate in a winery.

    If you’re visiting a vineyard, you might want to dress in a summery attire — a flowery dress is great, and a charming crop top adds a fun touch. Because the weather in wine country is unpredictable, you may want to bring some lightweight coats or sweaters. You might even want to wear jeans – though that would be a bit risky. Just be cautious not to be soaked with the red wine — the heat will make wiping it off much more difficult.

    What Are the Five S’s Of Wine Tasting? See- Swirl- Sniff-Sip-Savor

    Take note of the wines’ hues and aromas. The color of the wine is a good indicator of its intensity, which is a good indicator of its quality. A sweeter wine will have a darker hue and a stronger aroma. To determine the quality of a grape variety, consider how it feels to the touch. The wine’s texture and flavor should appeal to the senses and leave you wanting more.

    Inhale the aromas of the wines. Generally, the color of the wine indicates the grape variety. The aroma of a grape provides information about the grape variety that produced it. If it has been matured in barrels, it will have a deeper hue. Additionally, you can detect whether it has a woody or fruity aroma. Swirl and smell are excellent techniques to identify the taste of a wine.

    Taste. While it is necessary to be able to taste the perfume and flavor of a wine, it is also necessary to be able to recognize the alcohol. While sipping wine, suck in air from the outside and swirl it about your lips to maximize the wine’s flavor. As you breathe in, ensure that you do it gently and via a small hole in your mouth. This increases the number of esters and other taste components released by the wine.

    Why Is Wine Tasting So Popular?

    Vitamin Manufacturers

    The solution is as straightforward as it is complicated. The science is rather straightforward – when someone drinks a wine, they must analyze a variety of stimuli, including scent, taste, mouthfeel, and “structure,” before determining which is which. A normal taster will keep the wine glass in their lips for around five seconds, enabling the scents to penetrate their taste buds. This enables them to inhale more deeply and expel more esters. This manner, people can fully appreciate the wine’s taste.

    Wine tasting as a process and methodology dates all the way back to ancient times. The tradition dates all the way back to the origins of wine. Although the term “tasting” was first printed in 1519, it was not until the 18th century that it was established as a scientific method.

    The reason wine tasting is so popular is because it allows you to sample a range of wines without purchasing a whole bottle. This manner, you may become acquainted with a variety of people and their varied interests. After that, you may determine if you enjoy a particular wine and stick with it or go on to the next. Therefore, if you are unsure of what you want and hate, wine tasting is an excellent approach to discover other people’s tastes and make a choice.

    Do You Get Drunk at A Wine Tasting?

    While drinking on various wines, you may have a good time and learn a lot. Prior to visiting the wineries, you should eat a substantial meal. Second, always consume a modest snack prior to beginning your tasting. Thirdly, if you’re unsure how much you can manage, take a modest sip at a time and avoid feeling obligated to finish the entire glass.

    If you’re visiting a wine area for the first time, there’s no need to be concerned about being inebriated. While the majority of wines contain more alcohol than beer or liquor, they are not exceptionally potent. You should anticipate seeing its benefits within a short amount of time. Therefore, if you want to drink for an extended period of time, you might consider drinking less. Additionally, you do not need to consume an excessive amount of alcohol. You can drink a few glasses of wine without becoming inebriated.

    When it comes to alcohol use, it’s important to understand that wine tasting is an excellent approach to expand your knowledge of wine. While you should savor the flavor, you should also be cautious not to overuse it. Avoid overdoing it, or you risk overindulging. Given that the majority of wines contain more than 12% alcohol, they should be consumed in moderation. Aim to consume alcohol at a reasonable rate.

    The post What Does One Do at A Winery in Long Island, New York? appeared first on https://lodspeakr.org

    The post What Does One Do at A Winery in Long Island, New York? appeared first on https://wookicentral.com

    The post What Does One Do at A Winery in Long Island, New York? appeared first on https://gqcentral.co.uk

  • Veganism Myths Debunked – Eating Healthy Costs More

    Veganism Myths Debunked – Eating Healthy Costs More

    Veganism: Common Myths Debunked

    Veganism Myths Debunked: It’s boring, it’s too pricey, and I’m not going to get enough protein by eating it. Some of the falsehoods (read that as “excuses”) that surround the vegan diet are listed below. So let’s see if we can’t completely blast some of these out of the water together.

    Myth #1 – Eating healthy costs more

    One common misperception is that eating healthy will cost you money. This is not the case, especially when it comes to veganism. Indeed, I’m perplexed as to how this justification came to be, given that 8oz of steak costs dollars per pound whereas beans or mushrooms cost cents/pennies per pound.

    Fruits and vegetables, as well as grains, legumes, nuts, and seeds, are the major components of a vegan diet. These are all items that can be purchased in bulk at most grocery shops or supermarkets at a reasonable price. Then there are vegan alternatives to animal items that are likewise inexpensive, such as vegetable burgers and soy hot dogs. They don’t spoil easily and are excellent for you, so they’re also wonderful investments.

    Veganism Common Myths Debunked

    Milk substitutes, such as soy milk, can be equally as expensive as cow’s milk but give health advantages such as calcium, which is essential for strong bones. For many people, this advantage exceeds the added expenditure. Soy products are frequently high in protein, making them more expensive than less healthful meals, but their nutritional content makes them well worth it. People who buy tofu on a daily basis would most likely spend more money on meat if they did not consume soy products.

    Because fruits and vegetables retain their nutritional content even when frozen or canned rather than fresh, healthier vegan alternatives tend to be less expensive than eating meat.

    It is simple to have a balanced, nutritional, and economical vegan diet without spending a lot of money or time making difficult foods. Eating vegan can save you time when shopping since it allows you to get everything you need from a single location, such as a grocery store or supermarket, rather than exploring multiple separate places for ingredients that may not even be available there.

    Because most fruits and vegetables are tasty fresh, you may save money by not using power or gas to prepare meals.

    Is it too expensive? It costs more to be unwell in the future than it does to invest in healthy eating today. Consider it a different type of health insurance (1).

    Myth #2 – a plant-based diet is bland

    Umami is a fundamental flavor (the others being salty, sweet, bitter, and sour). Umami appeals to us because it makes our mouths thirst for more food. Humans love meat because it contains glutamate, which is responsible for the umami flavor (2).

    However, there are several vegan sources of glutamate that provide a similar flavor sense. Grains contain a lot of free glutamic acid, which naturally converts to monosodium glutamate. Soy sauce and fermented bean paste are two more foods that are high in glutamate (miso). Mushrooms, tomatoes, and sea vegetables, particularly kombu, offer the umami flavor we love (3).

    Yeast extract, popularly known as Marmite or Vegemite, is an excellent source of umami flavor. This delectable spread may be eaten on toast or mixed into spaghetti to fulfill the umami need. Because it has a salty flavor, it may be used in soups, stews, sauces, and casseroles for a flavor boost.

    Spices and condiments such as salt and pepper may transform any meal into something wonderful without the usage of pricey products such as meat or fish. With these few ingredients, it’s simple to make flavorful recipes. They last a long time and you only need a small amount, so they save you money as well.

    Another thing to remember is that nothing tastes better than rescuing the earth and the lives of countless creatures.

    Myth #3 – you need to eat meat and eggs to get enough protein.

    how to start a vegan lifestyleWhen discussing a vegan diet, one of the first topics that most people bring up is whether or not you can obtain enough protein.

    Protein is a necessary macronutrient that aids in the healthy functioning of your body. It is very important to include in a healthy diet since it supplies building blocks for muscle growth and repair (after exercise or injury). Plant-based meals include a lot of protein. Don’t worry if you’re a vegan trying to preserve your health while being active! Many plants, such as kale, provide lots of protein, as do beans such as soybean sprouts, which have roughly 5 grams per serving, and lentils, which have 4 grams per cup.

    Protein quality is crucial, and while meat has more protein than plants, veggies also have a lot of it. We’re talking about quality above quantity here. Vegan protein sources include tofu, beans, nuts, seeds, tempeh, and edamame (4).

    The fact is that we are suffering from more heart disease, cancer, and diabetes than ever before as a result of eating more animal protein. This is due to the cholesterol in meat, which veggies do not have (5).

    Another thing to consider is when was the last time you heard of someone in the Western world suffering from a protein deficiency? (6) We consume twice as much food as we should on a daily basis. Fiber is something we don’t get enough of. That is the issue! Please accept my apologies, but a lack of fiber is a million-dollar constipation problem (7). To prevent bowel cancer, we need 30g of fiber every day. That is far more essential than being concerned about obtaining adequate protein. Plants are the only source of fiber. There isn’t any meat.

    Anyone who claims that a plant-based diet will leave you deficient in protein is delusory. As evidence, the world’s largest and most powerful creatures, such as elephants, rhinos, and giraffes, solely consume plants. M’lord, I rest my case!

    Myth #4 – You don’t get enough nutrients on a plant-based diet.

    What a bunch of nonsense!! I can’t believe this is something that people believe. Plants contain far more nutrition than animals. They are more nutrient-dense pound for pound. I find it astonishing that someone who lives on a fast-food diet with all of the nutrients removed can compete with me on a vegetable-rich diet (1).

    When you think about it, our forefathers didn’t eat a single manufactured food. They ate fresh fruits and vegetables as well as the occasional animal that they were able to capture. I believe our forefathers would have gone extinct if they had consumed fast food.

    The naysayers are frequently the least knowledgeable because they believe that if they yell loud enough about vegans, it will shift the emphasis away from them and what they consume every day!! Sorry for the rage!

    Brought To You By – Local SEO – Google Ranking Monster

    References

    1. Nutritional Update for Physicians: Plant-Based Diets https://www.ncbi.nlm.nih.gov/pmc/articles/PMC3662288/
    2. Umami Foods https://www.healthline.com/nutrition/umami-foods#TOC_TITLE_HDR_2
    3. Plant-based umami https://www.delishknowledge.com/plant-based-umami/
    4. The 16 Best Sources of Vegan Protein https://www.livekindly.co/best-sources-vegan-protein/
    5. Eating red meat daily triples heart disease-related chemicals https://www.nih.gov/news-events/nih-research-matters/eating-red-meat-daily-triples-heart-disease-related-chemical
    6. Protein deficiency – a rare nutrient deficiency https://pubmed.ncbi.nlm.nih.gov/29786804/
    7. Mechanisms, Evaluation, and Management of Chronic Constipation https://www.ncbi.nlm.nih.gov/pmc/articles/PMC7573977/


    The post Veganism Myths Debunked – Eating Healthy Costs More appeared first on https://gqcentral.co.uk

  • How to Start a Vegan Lifestyle – Get Educated, Make A Plan

    How to Start a Vegan Lifestyle – Get Educated, Make A Plan

    How to Start a Vegan Lifestyle

    How to Start a Vegan Lifestyle – Get Educated, Make A Plan: If you’re considering becoming a vegan, you should do your homework first. Veganism is a significant commitment with a number of possible benefits and cons.

    Here are some tips to help you make the switch from omnivore to vegan.

    Learn More

    To begin, educate yourself on the vegan lifestyle. While abstaining from animal products simplifies one part of your life, there is much more to it. If you don’t consume meat or fish, you’ll need to find other sources of protein. Lentils, tofu, quinoa, tahini, and even some vegetables are abundant in protein (1).

    Make a Strategy

    Before making any adjustments, it’s critical to envision your new vegan lifestyle. Do you want to make a gradual transition or go cold turkey? Do you want alternatives to all animal products in your life, or are you happy with just a few? Many people prefer gradual rather than abrupt adjustments, which helps them ease into their new diet and guarantees that they stick with it for the long haul! Another alternative is to try a vegan diet for a week or a month. Veganuary (2) is a concept in which you experiment with veganism for the month of January. The best part is that many other people will be doing it as well, allowing you to support one another along the road.

    How To Start A Vegan Lifestyle

    Find Your Motivation   

    Understanding why you choose to become a vegan is critical for staying on track when temptation strikes. Make a list of all the reasons you want to make this change and keep it handy for when your drive wanes. You are almost probably driven by one of these considerations, but if you are still undecided, one of the following may assist you in making your final selection.

    Health Benefits – A vegan diet has various health benefits. From boosting the immune system to lowering the risk of contracting a potentially fatal disease.

    Animal Welfare/Animal Rights – the condition of meat-bred animals is horrible. While many meat-eaters choose to ignore this, for those of us with a conscience, a plant-based diet is the only viable option.

    The environmental impact is that enormous tracts of land and forests are being destroyed to make space for cow grazing. As a result, certain animal species are on the verge of extinction. Furthermore, animal husbandry contributes to the emission of greenhouse gases. As a result, becoming a vegan reduces one’s carbon footprint dramatically (3).

    Spiritual Beliefs – If you live a spiritual life, you will love all of God’s creatures.

    Religious Motives — Several religions, including Hinduism and Buddhism, promote a meat-free diet. Furthermore, many other global faiths and eating ideas, such as Ahimsa and Ital, consider animal slaughter for food to be prohibited (4).

    Concerns about social justice and humanitarian issues – Animals are not only raised and slaughtered for their meat, but they are also regularly mistreated. It is, however, not limited to animals. The chicken industry has a long history of mistreating its workers (5).

    Obtain Help

    If you discover that you are enthusiastic about veganism, it may be beneficial for you to connect with people who have previously or are currently on this road. You may discuss about all things vegan by joining Facebook groups (6), interacting with other vegans on social media, or looking for local meet-ups! Allow no one to try to persuade you out of your new way of life; their negativity will benefit neither of you.

    Maintain Your Health

    Preparing all of your favourite non-vegan items and stockpiling vegan equivalents for your favourite snacks and sauces may assist you in remaining healthy during this transition. You’re more likely to feel sluggish or hungry if you don’t consume a well-balanced diet after becoming a vegan. You should have all you need to succeed if you have the correct support system, food plan, recipes, and tools.

    Maintain a Positive Attitude

    Veganism is all about making a difference with one’s actions. Every day, as you go about your business as usual, you can make a conscious effort to ensure that no animals are harmed while you are making dinner. Do not be concerned if huge results do not appear right away; small measures taken every day will eventually lead to the desired result.

    Have Fun

    how to avoid electrical fires

    Investigate vegan substitutes for your favourite dishes, and set aside time to try out new recipes. Baking can be soothing, but cooking can be cathartic. Dive into the recipes and give them your own spin. You might also try something new and buy through a subscription service. Purple Carrot and Fire Road are both well-known (7). This is a simple and enjoyable method to learn about different cuisines and recipes. Nobody ever said, “Being healthy has to be boring!”

    It is now easier than ever to live a vegan lifestyle by finding activities and foods that you enjoy!

    Transitioning from an omnivore to a vegan diet should be a breeze with these tips and strategies at your disposal! Avoid becoming annoyed if things do not go as planned straight immediately; everyone encounters hurdles from time to time. Maintain your motivation by using what you’ve learned here. Educate yourself on all aspects of the lifestyle, design a suitable approach, and fully implement it.

    This should be sufficient to start you on your vegan path. We wish you all the best on your adventure.

    Brought To You By Google Ranking Monster

    References

    1. Top 10 Vegan Protein Sources https://www.peta.org.uk/living/top-10-vegan-protein-sources/
    2. Try vegan this month. https://veganuary.com/
    3. Interactions among Amazon land use, forests, and climate: prospects for a near-term forest tipping point https://www.ncbi.nlm.nih.gov/pmc/articles/PMC2373903/
    4. 4 world cultures and religions that embrace plant-based eating https://www.greenpeace.org.uk/news/world-cultures-and-religions-plant-based-vegetarian-vegan-diet/
    5. Oxfam Report Reveals Abuse of Workers at Chicken Farms https://mercyforanimals.org/blog/oxfam-report-reveals-abuse-of-workers-at/
    6. Vegan UK https://www.facebook.com/groups/vegangroupuk/
    7. 10 vegan activities to stay happy and healthy https://vegnews.com/2020/3/10-vegan-activities-to-stay-happy-and-healthy

    The post How to Start a Vegan Lifestyle – Get Educated, Make A Plan appeared first on https://bjorntoday.com

    The post How to Start a Vegan Lifestyle – Get Educated, Make A Plan appeared first on https://wookicentral.com

    The post How to Start a Vegan Lifestyle – Get Educated, Make A Plan appeared first on https://gqcentral.co.uk

  • CBD Buffalo Chicken Sliders Recipe

    CBD Buffalo Chicken Sliders Recipe

    What’s the Super Bowl without a super snack? Try our CBD buffalo chicken sliders with our CBDelicious CBD powder today. Go sports!

    CBD Buffalo Chicken Sliders Ingredients:

    3 cups shredded chicken
    a half-cup ranch dressing
    a half-cup buffalo sauce
    CBDeclicious Powder by CBDistillery required amount
    1/4 cup melted butter
    1/2 teaspoon garlic salt
    12 teaspoon Italian seasoning
    2 cups shredded cheddar cheese
    1 package (12 count) Kings Hawaiian Rolls

    Cooking Instructions:

    1. Preheat the oven to 350 degrees Fahrenheit.
    2. Combine the chicken, ranch, cheese, buffalo sauce, and desired amount of CBDistillery‘s CBDelicious Powder in a medium mixing bowl.
    3. Combine the melted butter, garlic salt, and Italian seasoning in a small mixing basin.
    Place aside.
    4. Cut your buns in half and lay the bottom half in a baking dish.
    5. Place the CBD chicken mixture on the bottom half of the rolls.
    6. Place the top halves of the buns on top and brush with the melted butter mixture.
    7. Bake for 15 minutes with the dish covered in tinfoil.
    8. Remove the foil and bake for 5 minutes more (or until the tops of the sliders are golden brown).
    9. Remove from oven, cut into slices, and serve.

    The post CBD Buffalo Chicken Sliders Recipe appeared first on #CBDMOVEMENT™ BLOG.

    The post CBD Buffalo Chicken Sliders Recipe appeared first on Zen Pro CBD.

    The post CBD Buffalo Chicken Sliders Recipe appeared first on https://gqcentral.co.uk

  • Make More Terpenes With This Recipe.

    Make More Terpenes With This Recipe.

    Make More Terpenes With This Recipe.

    Make More Terpenes With This Recipe: The term “terpene” can be found everywhere in the cannabis world. Terpenes are more popular than ever thanks to the world’s passion for cannabis science and research. It has even been proposed that its use will be one of the following significant booms in cosmetic marketing. So, let us discuss terpene production and why it is significant.

    Why are terpenes important?

    Terpenes play an essential role in how cannabis, mainly THC, affects the person who consumes it. Terpenes are primarily responsible for the effects of each strain. They significantly enhance the effects of THC and CBD by modulating their actions.

    Terpenes are supposed to be responsible for the “entourage effect,” which is described as an orchestra of cannabinoids and terpenes working harmoniously. Even while they all contain comparable terpenes, the different percentages of a terpene blend can lead one strain to treat neuropathic pain another to help with insomnia. Yet, another to help with chronic fatigue. Regrettably, conventional medicine is not built to cope with numerous components in a single drug, and cannabis extracts include hundreds of them.

    sativa-

    A higher terpene level indicates higher quality products, more significant therapeutic potential, and a more pleasurable experience. Terpene content increases the excitement, tastiness, and potency of cannabis extracts. Their interest grew after Dr Ethan Russo’s work for GW Pharmaceuticals in 2011. While the cannabis community has thoroughly embedded this knowledge in the culture, it may not have reached its pinnacle in the broader pharmaceutical, medicinal cannabis formulations.

    One of the most intriguing aspects of cannabis terpene production is that the plant synthesizes terpenes early in its life then re-synthesized them into more complex terpenes. This understanding demonstrates why it is beneficial to keep plants in good health throughout their lifetimes.

    How to make essential oils in a perfect environment

    While the plant has the genetic code to make terpenes, they cannot be produced unless the requisite elements are present in the soil or other growing media. Growing media does include the appropriate N-P-K ratio, but it won’t get you very far.

    Beneficial bacteria, fungi, and microorganisms should be present in healthy soil. These biological components make the soil fruitful and carry out processes that convert raw waste elements into bioavailable plant nourishment. As a result, many farmers nowadays refer to “feeding the soil” rather than “feeding the plants.” Our guide on making your organic soil will help you learn what it takes to make a strong foundation of homemade soil.

    So, how can you ensure that your soil is thriving with the beneficial additives required to take cannabis’ fragrant characteristics to the next level?

    Lactobacillus Serum is a straightforward approach to manufacturing soil additives. It’s not easy, but inexpensive goes a long way and is entirely practical. A year’s supply can be made for less than £10.

    Plants are not the only ones who benefit from probiotics.

    If you take probiotic pills for your gut health, you’ve probably heard of this brand. Bacteria that live in your gastrointestinal system help keep you healthy in general. A little-known feature about Lactobacillus is that eating it increases the number of cannabinoid receptors in your gut.

    Those who often use canna-capsules or take drugs should ensure that they consume a sufficient amount of these helpful microorganisms. This could increase the potency of the cannabinoids you ingest. Wouldn’t it be great if your harvest could go further or be more effective? Fermented foods like sauerkraut, pickles, sourdough, and other healthy delights contain approximately 90% of the germs found in honey. Let’s look at how to create them for a fraction of the cost of what you’d get in a health food store.

    Lactobacilli, an anaerobic bacterium, are seen in Lactobacillus Acid Serum (LABS) (anaerobic). Numerous Lactobacillus strains can compost and decompose a wide range of materials. Because of this, they are a good way to replenish the soil’s nutritional levels.

    I’ll describe a method I was shown a few years ago.

    Ingredients

    Rice

    Water with minerals

    Milk

    Molasses

    marijuana-

    Equipment

    Bucket

    Pitcher

    String/elastic tape

    Syringe/pipette

    Towel for the kitchen

    jar/bottle made of glass

    1st step:

    Prepare a rice wash. This is relatively straightforward. Take a handful of rice and a glass of water. In the water, wash the rice. Drain the rice but save the water – that’s what you’re looking for. Because microbes thrive on carbs, we must set a trap. Cook the leftover rice for dinner later.

    Step two:

    In a glass trap, collect the bacteria. Fill a glass jar halfway with rice pudding wash. Use a clean cloth or a kitchen towel to cover it. It’s important that the jar’s sides are completely sealed. A rubber band or string is proper. This keeps the dirt out while allowing the bacteria in the air to enter the jar and start eating the starch. Spot the jar in a dry place with plenty of fresh air. Three layers will appear after a few days. A layer of foam on top (which you do not want). Microbes in liquid form at the centre (this is desirable). Sediment on the seafloor (this is also undesirable).

    Third step:

    Gather the liquid microorganisms. Take off the cloth. Aspirate the middle layer of liquid from the glass trap with a syringe. This will have a bit sour smell, which is acceptable. It signifies that it was successful. Make sure that you don’t disrupt the bottom sediment. Because you’ll have plenty to work with, it’s fine to leave some liquid in the jar.

    4th step:

    Mix in the liquid bacteria with the milk. Lactose in milk acts as a glucose source for lactobacilli. Close the bucket with a lid and set it aside for 5-7 days at a consistent temperature. This will give the serum adequate time to develop. The whey separates from the lactose during this procedure, leaving two layers. On top is a curd, and underneath is a liquid serum.

    5th step:

    Remove the bucket’s lid and carefully remove the curd layer from the top. It will most likely dissolve, so don’t be too concerned. After removing it, strain the residual serum with a cloth or an old t-shirt (make sure it is clean). Because this is the beginning of the cheese-making process, it will smell like cheese. You’re ready to go once your liquid has split and is clear of lumps. Hopefully, you are on your team’s compost at home and have composted the curds. It still has a high concentration of helpful microorganisms. If you have a dog, feed some of it to him. They adore it – they go crazy for it – and it’s beneficial to their intestinal health! God bless grass-fed animals.

    Sixth step:

    Use it as is or store it in a bottle for long-term use. At this point, you can store it in the refrigerator in a glass bottle or jar for up to a year without noticing any apparent degeneration. It will preserve for several years at room temperature if mixed in a 1:1 ratio with molasses. I would create this mixture at least once a year rather than rest for two years – it’s always better to keep these microorganisms fresh and protect the quality.

    How to Use LABS to Produce Terpenes

    This is strong stuff! You only need 1-3ml per 10l of water to inoculate the soil with Lactobacillus enough to boost soil biology.

    As little as 0.1ml per litre of water can be used as a foliar spray. If you use too much, your room will smell like a farm or a cheese factory for the following 24 to 48 hours.

    It’s fantastic to observe how more alive your plants appear after adding this old yet prolific bacteria. It’s difficult to put into words, yet they feel more alive.. Within a week to ten days, you should detect indicators that it’s working because the stems will become a little stickier, and if you sniff them with your fingers, you should sense an improvement in the aromatic intensity.

    It is not necessary to add it at each feeding. Inoculating the soil every two weeks is sufficient to avoid the colonisation of dangerous microorganisms.

    The post Make More Terpenes With This Recipe. appeared first on https://gqcentral.co.uk

  • Vegan Food Colouring – Is It Really a Thing?

    Vegan Food Colouring – Is It Really a Thing?

    Vegan Food Colouring – Is It Really a Thing?

    Vegan Food Colouring – Firms that innovate to suit new needs appear to have a strong customer following in today’s ever-changing industry. Plant-based and vegan dairy substitutes, such as ice creams, creamers, yoghurts, and drinks, are one segment pushing the frontiers of R&D. Over the previous five years, the number of vegan dairy product releases has surged by 112 per cent (Mintel 2018). The proportion of customers who identify themselves as vegan or vegetarian remains tiny. However, people are increasingly incorporating more plant-based meals into their diets for health and sustainability reasons.

    Colour is something that arouses our interest. Colour was one of the first elements we were introduced to when children. As we grew older, we were interested in it and related it to various other things, such as clothing and food. Is food colouring suitable for vegans?

    Colour makes the meal more appealing. Don’t we all agree that a salad looks lovely with all of the distinct hues of its ingredients?

    The success of these categories is due primarily to goods that provide a dairy-free profile without sacrificing flavour. Brands appear to be constantly distinguishing themselves through distinct flavour and colour characteristics.

    But you’re wondering if food colouring is okay for vegans to eat. Maybe you’re cooking for a bunch of vegans and want to be sure you don’t violate anyone’s culinary preferences.

    Let’s find out now!

    Why is Food Colour Important?

    Vegan Food Colouring

    Food colouring agents play a vital function. We cannot conceive food or its components without the use of colour. Colour makes food and its features more appealing to the eye and taste. Natural food colours are healthy for your health; however, artificially synthesised arterial colours are not, and the government should regulate their usage. Wherever artificial colours are used in food, they should be adequately labeled on the container. To maintain the safety and health of the general population, manufacturing enterprises and industries should rigorously adhere to the standards in food legislation.

    Colour additives assist in preserving food and improving its appearance.

    We need to regulate colour since it has an impact on branding. When individuals notice items changing colours, they may believe they are not receiving what they paid for. This may cause consumers to feel that the things are no longer of excellent quality.

    Quality control guarantees that you receive precisely what you paid for. Research and development keep you up to date on the newest trends and demand. Natural and healthy products are designed to benefit both humans and the environment. Colour measuring ensures that items are free of dangerous chemicals or dyes.

    Colour provides us with an idea of what we might anticipate in terms of taste and quality.

    In the food and beverage sector, colour can be the most important sensory attribute. Food colouring offers consumers an almost instant perception of a product’s freshness, flavour, and quality. This influences a consumer’s decision to buy that product or choose something more enticing.

    According to research, it takes customers 3-7 seconds to decide on a product. Companies must capture their clients in such a short period.

    It has also been estimated that 90% of purchasers buy a product after viewing its colour and forming an opinion about how it would taste.

    This colour-taste relationship has been around for a long time.

    Consumers often make purchasing decisions for food goods for two reasons:

    Food or beverage colour and appearance, which imply flavour and quality

    Previous encounters with that product or brand

    What Are Food Colors Made Of

    There is no single response that says all food colouring is unsafe for vegans. There are several varieties of food colouring, each with its history. So, depending on the food colouring used, it might be vegan or not.

    Natural Food Color

    The label “natural” may entice you to purchase them for your cooking requirements. However, not all-natural food colouring products available at the grocery store are safe. The majority of them, however, are derived from plants.

    However, one hue, red, requires the collecting and processing a kind of insect to obtain its extract. Cochineal is a kind of insect that may be encountered sucking moisture from the cactus. These insects are captured, dried, and treated to get that tempting red hue.

    On the food colourants label, avoid anything that reads Carmine, Natural Red 4, or E120. Other naturally generated food colours are harmless and originate from plants.

    Orange (E160b) is generated from annatto seeds; hence it is harmless. Caramel (E150a-d) is made from caramelised sugar, not endangered any living organisms. Elderberry juice (E163) can provide a rich purple hue to your recipe.

    Lycopene is a vegan-friendly form of red (E160d). Turmeric (E100) may offer your cuisine an appealing yellow hue if you desire anything yellow.

    Private Labe -Vitamins

    Artificial Food Color

    Using artificial food colouring is not a 20th-century marvel. In truth, dyes were used to colour food and cosmetics by the Egyptians as early as 1500BC, according to history.

    Because of potential health risks, the government now strictly guides and regulates the use of colouring compounds. The US government has reduced the number of artificial colouring compounds from over 700 to 7.

    Synthetic food colours are created from a mixture of organic components. They can be used as an additive in food and drinks to make them more appealing without adding taste. They are also used to provide colour to cosmetics.

    However, these artificial colourants have been linked to allergies and irritation, which is why the government carefully regulates them.

    However, these artificial colourants do not include any dairy, animal, or animal product, or living form, making them suitable for vegan eating.

    Natural and Basic Food Colorants

    If you are concerned about whether commercially purchased food colourants are safe for you and your vegan friends, developing your DIY food colourant is the best option. You can be guaranteed that everything is vegan-friendly this way!

    Here are some natural food colourings you might wish to experiment with!

    Beet juice

    Beet juice turns your meal or drinks a purplish-red tint. You can have a pink coloured treat depending on the sort and amount of beetroot juice you use in your recipe! Remember that adding beetroot juice will enhance the flavour of the beets.

    If you’re going to use it to make a drink, you might want to cut less on the sugar because it will add sweetness to the dish or drink!

    Turmeric

    If you’re creating a meal or a drink and want to add a bit of yellow colour, you may add turmeric to it to brighten things up. This will also give your drink or dish a tart taste.

    Spinach

    If you want to obtain green colour, boil spinach and then puree it in a food processor. Extract the liquid using a cheesecloth and set it aside to cool before storing. This will give any dish or beverage a green tint. You may use them to make a garden-themed dessert by combining them with icing.

    Red Cabbage

    I’m not sure what the term is, but red cabbage appears more purple, suitable? There is, however, a nice way for achieving blue. Finely chop your red cabbage and boil it for up to 20 minutes. Allow the liquid to cool before filtering it.

    Now comes the tricky part. With the addition of baking soda, your purple mixture might turn blue. To acquire the desired blue, add a few sprinkles at a time.

    Frequently Asked Questions

    Can Vegans eat food Colouring?

    Most ” natural ” food colouring is vegan because they are produced from plants; most “natural” food colouring is vegan. Carmine (also known as cochineal) is the lone exception because it is made from bugs. However, the most frequent food colouring you’ll find in food is artificial colours, which have designations like Red 40, Blue 1, and so on.

    How bad is food Colouring for you?

    There is no clear evidence that food dyes are harmful to most individuals. Nonetheless, they may trigger allergic responses in certain people and hyperactivity in hyperactive children. However, most food dyes are found in toxic processed foods, which should be avoided in any case.

    Are food dyes tested on animals?

    Many artificial colours are created in laboratories, and here’s the catch: they’re frequently tested on animals such as dogs and mice. Scientists examine the results of the tests to evaluate if the chemicals are safe to consume.

    Does food Colouring change the taste of food?

    The quantity of food colouring used and added to your icing or batter is the first reason it may alter the taste of your product. However, food colouring is not the only reason flavour may be influenced. In certain situations, you may have a bitter or chemical taste.

    Can Vegans eat red food dye?

    Don’t worry; it’s completely safe and not as disgusting as it appears. Because of the processing quantity, the dye has been separated from its entomological roots. However, if you’re vegan or kosher, you should avoid anything coloured with it.

    Why are dyes added to food?

    Colour additives can be used in food to improve natural hues, provide colourless and ‘fun’ dishes like cake decorations, and aid in taste identification (such as purple for grape flavour or yellow for lemon). Food dyes are another name for colour additives.

    SUMMARY

    In summary, colouring food makes it more appealing and pleasurable. The colour of the food communicates flavour and taste, which is why it has gained popularity.

    However, there are specific issues for vegans that must be defined. Natural red #4 is not environmentally friendly because it entails gathering insect secretions.

    Aside from that, artificial food colourants are created from chemical components and do not include dairy, meat, or other living organisms. However, there are also worries that these chemical compounds may cause allergies.

    So, is vegan food colouring safe? In general, they are. If you are concerned about store-bought food colourants’ safety, you can produce your own at home!

  • Freezing Morrel Mushrooms – Freeze-Drying Morrel Mushrooms

    Freezing Morrel Mushrooms – Freeze-Drying Morrel Mushrooms

    When freezing Morrel mushrooms, keep in mind that they cannot be frozen raw. The flavour of the mushrooms will be affected if they are frozen raw, but this will be noticeable only when cooking and serving and will ruin the entire dish.

    Preparation for Freezing Morrel Mushrooms

    Morrel mushrooms can be preserved by freezing them. Because fresh mushrooms can only be kept in the refrigerator for up to a week, they can be frozen and stored for much longer. Before freezing edible mushrooms, they should be cooked. Otherwise, when reheated, they will become mushy. Make sure to add frozen mushrooms to a dish without first defrosting them. Before freezing mushrooms, you can prepare them in three ways: sautéing, blanching, and steaming.

    If you enjoy mushrooms and use them frequently, you should know that freezing morrels allows you to get the most out of these expensive mushrooms. When freezing morrels, the key to success is to pre-cook them before freezing.

    Almost all mushrooms can be dried, and some taste even better because the drying process concentrates their flavour. Dried shiitake mushrooms are especially tasty, and some people like to use dried morels. Mushrooms can be dried in the oven. Simply clean the mushrooms with a soft brush, slice them, arrange them on parchment paper so they don’t touch, and bake for about an hour. Turn once more and bake for another hour, or until completely dry, turning several times if necessary.

    Dried morels are full of flavour and have a smoky, earthy aroma on the inside. They go well with meat, sauce, pasta, and poultry. They also go well with risotto, omelettes, stir-fries, quiches, and a variety of other appetisers. After the spring harvest, dried mushrooms are produced. The fact that they are organic adds to their allure.

    Do Freezing Morrel Mushrooms Make Them Fragile?

    Morrel mushrooms are fragile and decompose quickly, so growers have to put a lot of effort into processing them.

    Sautéing and freezing, pickling and canning are all methods for preserving mushrooms, and certain methods work best for certain types of mushrooms: sautéing and freezing, pickling and canning are all options for chanterelles, for example. However, drying is the most universal solution and can actually improve (or at least concentrate) the flavour and aroma of some mushrooms.

    The majority of mushrooms rehydrate well and can be used in soups and various pasta dishes. Dried mushrooms can be powdered and used as a seasoning. (A good dehydrator is the best and quickest way to dry mushrooms.)

    Can Freezing Morrels Help More People Enjoy Them?

    Morels are delicious and have a distinct flavour from other mushrooms. Mushrooms are often described as slimy or sticky by those who dislike them. Morels, on the other hand, are meaty, have a thicker consistency, and have a rich nutty flavour. The second reason is a lack of supply. Morels have a reputation as a mushroom for connoisseurs due to their popularity. People always want more of them, either because the name is prestigious or simply to see if the real thing lives up to the hype.

    Because Morrel mushrooms are delicate and don’t last long, freezing them is a good way to ensure that more people can try them.

    how to preserve morrel mushrooms

    How to buy Morrel Mushrooms

    Morrel mushrooms are among the most valuable mushrooms in the world, but many people are unaware that they are harvested in the wild rather than cultivated. As a result, fresh morels are only available in the spring. If you buy morels all year, they will dry out. However, it is preferable to buy the mushrooms in the spring and then freeze them for later use.

    Morrel mushrooms thrive in warm climates and typically grow near decaying elm trees. Temperature swings can have an impact on the number of mushrooms that sprout, which may explain why they’ve been harder to find this year. Local markets frequently pay a premium for mushrooms picked by pickers in order to resell them at their peak of freshness. The number of morels found and sold in some local markets has decreased.

    A morrel is a type of mushroom that belongs to the genus Morels. Nobody knows how many species of morels there are because new species and varieties are discovered every year. Because there are so many different types of morels, they can appear quite different. So don’t be alarmed if the morels you buy in one place don’t look like the morels you buy in another.

    Preserving fresh morels

    I’ve tried every method for preserving fresh morels and can confidently say that blanching is the best. The mushrooms can be safely stored for a longer period of time if they are partially cooked. Simply cook the cleaned mushrooms for 5 minutes in a pot of boiling water. Strain and set aside to dry. Before putting them in an airtight container and storing them in the freezer, make sure they are completely dry.

    Freeze-drying Morrel mushrooms

    how to make a mushroom bedFreeze-drying your morels is an excellent option if you have a freeze dryer. A freeze-dried Morrel mushroom keeps its nutritional value for at least 20 years and retains more than 95 percent of its nutritional value. Even better, when rehydrated, a freeze-dried morrel mushroom is virtually indistinguishable from a fresh harvest. A freeze-drying machine is not cheap, but there is no better way to store mushrooms.

    Morels are edible wild mushrooms related to truffles that are popular among chefs and gourmets. Because of their earthy, nutty, and smoky flavour and texture, these wild mushrooms are the star of any dish, especially since they require very little seasoning when cooked. Unfortunately, the morrel mushroom season is often brief, lasting only a few weeks in some areas, if at all. Even more reason to dry these popular mushrooms so that they can be enjoyed at any time. Morels, fortunately, are simple to dry at home and can be stored in airtight tupperwear on a shelf or in a pantry for up to 6 months.

    Yes, drying them is an option as well. If you don’t want to freeze morrel mushrooms, you can easily dry them. There are three methods for doing this: air drying, oven drying, and using a food dehydrator. To begin, soak the mushrooms in salted water for 10 minutes, stirring occasionally. This should be done for 1-2 minutes to loosen any dirt or grains that have gotten stuck on the mushroom.

    You should let them air dry after soaking before putting them in the food dehydrator. After they have dried, place them in your food dehydrator until they are well preserved.

    How are dried Morrel mushrooms preserved?

    For starters, dried morel mushrooms are much easier to keep. Dried morel mushrooms can be stored in airtight containers at room temperature. Freeze-dried morels can also be kept for up to a year.

    Morels can be dehydrated in a dehydrator and then added to soups, pasta, and stews. I’ve also seen dried morels for $20 an ounce in shops that sell dried fruits, nuts, and mushrooms, so there’s a market for them.

    Have You Ever Thought About Freezing Morrels?

    “Can you freeze morels?” many people wonder. and the answer is yes, you certainly can. They can be sliced or frozen whole. I like to clean them and then freeze them because slicing them and then freezing them loses the flavour. Many people freeze morels sliced, but I prefer to freeze them whole.

    The classic mushroom duxelles recipe is a tried-and-true way to save freezer space. When I freeze wild mushrooms, I do it this way 99 percent of the time. In the long run, freezing mushrooms is the best option because they don’t contain vinegar or a lot of salt and spoil quickly in the fridge. Because the mushrooms are already cooked and finely chopped, there is no need to worry about texture loss when freezing duxelles. Puff pastry can also be frozen in this manner, but be prepared to dice it.

    Freezing morels for long-term preservation.

    If you’re wondering, “Can morels be frozen?” Morels can be frozen, thus the answer is yes. It is critical not to freeze raw morels since they will lose flavour and texture when reheated. Before freezing, the mushrooms should be boiled or sautéed. I hope the step-by-step instructions in this post assisted you in preparing morels for freezing.

    Before freezing, make sure to check any ruined ones as well. You only want to keep the finest of the best. Allow yourself to appreciate the less-than-perfect ones as a treat for all of your hard effort!

    Perhaps you discovered a swarm of morels. Perhaps a buddy brought you a few fresh chanterelles. Alternatively, fresh maitake is now available at the store. Great! However, such an opportunity brings a few concerns: How can I keep my mushrooms fresh for a long time? Is it possible to freeze morels? How long do mushrooms last in the refrigerator? I hope these questions and answers regarding long-term mushroom storage were useful.

    Brought to you by UCanGrowMushrooms.com

    The Article Freezing Morrel Mushrooms – Sensible Methods First Appeared ON
    : https://ad4sc.com

    The post Freezing Morrel Mushrooms – Freeze-Drying Morrel Mushrooms appeared first on https://gqcentral.co.uk