Category: Water Solutions

  • Crawl Space Drainage Services for Home Protection in Squamish

    Crawl Space Drainage Services for Home Protection in Squamish

    Crawl Space Drainage by Pacific Blue Mechanical & Plumbing, Home & Business Plumbing Experts
    Serving Squamish and British Columbia. 500 Google reviews.
    Pacific Blue provides expert guidance on effective crawl space drainage systems to prevent water damage and maintain structural integrity in vulnerable homes.

    Comprehensive Guide to Crawl Space Drainage Services for Homeowners

    What Essential Role Does Effective Drainage Serve in Reducing Water Damage Risks?

    Crawl Space Drainage Services in Squamish: A rain-swept house in Squamish, BC, with gutters and downspouts channeling water away from the foundation amid misty mountains.

    Crawl Space Drainage Services in Squamish: Effective drainage is vital for shielding homes from significant water damage, particularly in regions like British Columbia, where heavy rainfall frequently occurs. By installing reliable drainage systems, homeowners can effectively manage moisture buildup and redirect water away from the foundation. This practice becomes especially crucial in areas with high precipitation, where prolonged exposure to moisture can result in structural damage, mould growth, and soil erosion. For instance, homes in Squamish face an increased risk of water infiltration due to the region’s humid climate, making efficient drainage not just an option but a necessary step to preserve the building’s structural integrity.

    In British Columbia, especially in coastal areas, homes are often situated on water-retaining soils, which heightens the risk of flooding in crawl spaces. Implementing effective drainage solutions, such as French drains, can mitigate this issue by efficiently channeling excess water away from the foundation and reducing the potential for costly repairs. Homeowners should proactively evaluate their drainage needs, particularly after heavy rain events, to ensure their properties remain secure and protected.

    What Key Components Constitute Effective Drainage Systems?

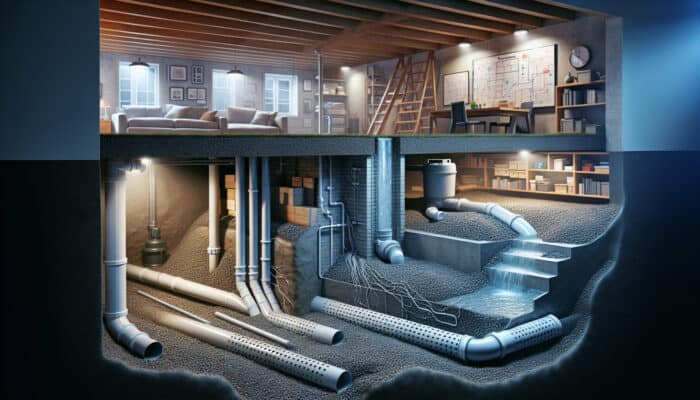
    Effective drainage systems comprise several essential components that work together to maintain a dry and healthy crawl space environment. Key elements include sump pumps, French drains, and vapour barriers, each fulfilling a distinct role in moisture management. Sump pumps are crucial for eliminating any accumulated water, while French drains facilitate the movement of water away from the foundation. Vapour barriers are equally vital as they prevent moisture from the ground from penetrating the crawl space, thereby ensuring dry conditions.

    In Canadian homes, particularly in regions like Squamish with unpredictable weather patterns, integrating these components is essential for effective moisture control. For example, during the rainy season, sump pumps can be invaluable, swiftly removing water that could jeopardize the home’s structural integrity. Furthermore, the installation of a vapour barrier can significantly lower humidity levels, decreasing the risk of mould and other moisture-related issues. Homeowners investing in these systems can be assured they are taking substantial steps to protect their properties from environmental challenges.

    What Common Indicators Suggest the Need for Drainage Services?

    Homeowners must be vigilant in recognizing the early warning signs that indicate the need for drainage services. Timely identification of these indicators can prevent more severe issues down the line, especially in regions prone to heavy rains or seasonal flooding, such as Squamish. Common signs to watch for include water pooling in or around the crawl space, musty odours permeating the home, and visible mould growth in the area.

    • Water pooling in the crawl space
    • Musty odours indicating mould presence
    • Visible mould or mildew
    • Increased humidity levels indoors
    • Cracks in the foundation walls
    • Wood rot in structural components
    • Unusual insect activity

    Promptly addressing these issues can save homeowners from expensive repairs and ensure that their properties remain secure and sound. Regular inspections are crucial in identifying these signs before they escalate, particularly in the variable climates found in Canadian provinces.

    How Does Crawl Space Drainage Function Effectively?

    Cross-section of a residential crawl space showing gravel beds, perforated PVC pipes, and sump pump draining water under dim lighting.

    What Are the Steps Involved in the Standard Installation Process for Drainage Systems?

    The installation process for a crawl space drainage system typically involves several essential steps to ensure the system functions effectively. Initially, a comprehensive crawl space assessment is conducted to evaluate existing conditions and the homeowner’s specific requirements. After analyzing moisture levels and the structural integrity of the foundation, excavation may be necessary, particularly if the current drainage system is inadequate or improperly installed.

    Once the assessment is complete, specialized drainage pipes are installed in the crawl space. These pipes are designed to capture and redirect water away from the foundation, adhering to Canadian building standards. This tailored approach enhances the drainage system’s functionality and ensures its durability and effectiveness in managing moisture under the unique climatic conditions found in areas like Squamish.

    Finally, an inspection is performed to verify that the installation has been executed correctly, with a focus on quality and adherence to local regulations. Homeowners are often provided with guidance on maintaining their new drainage system to maximize its lifespan and efficiency, ultimately safeguarding their investment for years to come.

    What Principles Guide Effective Water Diversion Techniques?

    The principles of effective water diversion techniques are grounded in understanding how water behaves in various environments. At its core, these methods rely on fundamental concepts such as gravity and the use of pumps to channel water away from vulnerable areas. In crawl space drainage, the design of the system is critical for preventing soil saturation around the foundation, which can lead to structural instability.

    Utilizing gravity to direct water towards properly installed drainage systems efficiently moves excess moisture away. In Squamish, where soil can become oversaturated during heavy rainfall, strategically positioning drainage pipes and employing sump pumps can significantly reduce the risk of water accumulation. Homeowners should appreciate these techniques, as they underscore the importance of maintaining a stable indoor environment free of mould and structural damage.

    Moreover, it is essential to consider the surrounding landscape and soil type when crafting these systems. By thoroughly assessing these factors, professionals can create drainage solutions that are both effective and sustainable, ensuring that property owners are shielded from the unpredictable weather patterns typical of Canadian climates.

    What Factors Impact the Effectiveness of Drainage Systems?

    Cross-section of residential crawl space showing drainage pipes diverting water, with clay soil retaining moisture and sandy soil allowing runoff under soft light.

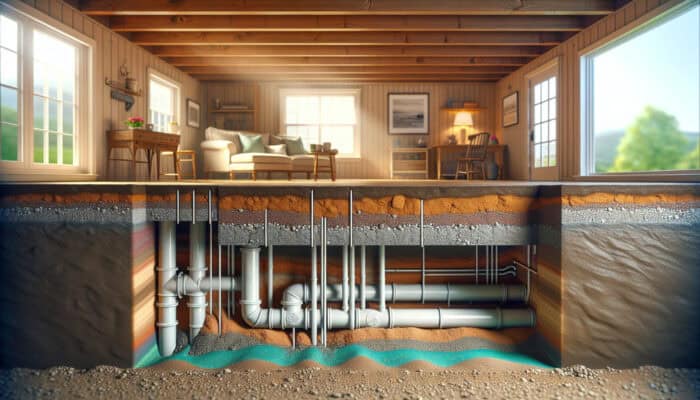
    The effectiveness of crawl space drainage systems hinges on several factors that dictate how well they manage moisture levels. One significant aspect is the type of soil surrounding the property. For example, clay soils tend to retain water, while sandy soils facilitate improved drainage. Understanding the soil composition informs the design of the drainage system, ensuring it can effectively divert water away from the foundation.

    Another crucial factor is the slope of the land. Proper grading allows gravity to assist the drainage system, guiding water away from the structure rather than towards it. In many Canadian homes, particularly in regions like Squamish with diverse terrain, ensuring correct grading is essential for optimal performance. Additionally, the quality of materials used to construct the drainage system is vital; durable, high-quality materials are less susceptible to damage and can withstand the harsh environmental conditions often present in Canada.

    By considering these factors, homeowners and professionals can ensure a well-functioning drainage system that mitigates moisture risks while enhancing the property’s overall longevity. Regular evaluations and adjustments based on these elements can further boost the efficiency of drainage systems, ensuring they remain effective over time.

    What Maintenance Practices Are Essential for Ensuring Long-Term Effectiveness of Drainage Systems?

    Maintenance is crucial to ensuring the long-term effectiveness of crawl space drainage systems. Regular inspections and monitoring can help homeowners detect potential issues before they escalate into costly repairs. In Canada, where weather extremes create unique challenges, adhering to a proper maintenance schedule is vital. Homeowners should aim to perform inspections at least annually or after significant weather events to evaluate the system’s performance.

    During these inspections, it is important to check for blockages in drainage components such as sump pumps and French drains. Cleaning these elements and removing debris can prevent clogs that impede water flow. Additionally, homeowners should verify that vapour barriers are intact and functioning as intended, as they help maintain low humidity levels in the crawl space.

    Timely repairs are also a critical component of maintenance. If any issues arise during inspections, addressing them immediately can avert more significant problems down the line. By following these best practices, homeowners in Squamish and other Canadian regions can ensure their crawl space drainage systems remain effective, protecting their homes from moisture-related concerns for years to come.

    Insights from Experts on Crawl Space Drainage Services in Squamish

    How Do Professionals Evaluate and Recommend Optimal Drainage Solutions?

    When professionals assess crawl space drainage needs, they begin with a detailed examination of moisture levels and the home’s structural requirements. This assessment involves not only inspecting the crawl space itself but also considering factors like local climate, soil conditions, and the existing drainage system. By understanding these variables, experts can recommend tailored solutions that adhere to Canadian best practices for moisture management.

    For example, if a home in Squamish exhibits elevated humidity levels, professionals may recommend installing a sump pump alongside a comprehensive drainage system. This combination enables effective water removal and moisture control, specifically addressing the challenges posed by the region’s climate. Additionally, experts will provide homeowners with actionable steps to guide them through the installation process, ensuring that all recommendations comply with local building codes and standards.

    Ultimately, this personalized approach not only enhances the effectiveness of drainage solutions but also empowers homeowners with the knowledge needed to maintain their systems long-term. By relying on expert insights, homeowners can feel assured that their properties are shielded from the damaging effects of water intrusion.

    What Advanced Materials Are Utilized in Modern Drainage Systems?

    In crawl space drainage, selecting appropriate materials is crucial for ensuring the system’s durability and effectiveness. Advanced materials such as PVC pipes and Geotextiles are increasingly favored for their resilience and performance. PVC pipes are renowned for their corrosion resistance and longevity, making them ideal for directing water away from foundations, ensuring that drainage systems remain functional over time.

    Geotextiles serve a dual purpose: they act as filters to prevent soil intrusion into drainage systems while facilitating water movement. This innovative material is particularly advantageous in Canadian climates, where heavy rainfall can saturate the ground and challenge traditional drainage methods. By incorporating advanced materials into drainage setups, professionals can design systems that are not only effective but also capable of withstanding the harsh elements typical of regions like Squamish.

    The integration of these materials is often supported by Canadian engineering standards, ensuring they meet the demands of local environmental conditions. This focus on quality and performance can significantly enhance the overall effectiveness of crawl space drainage systems, providing homeowners with peace of mind regarding the safety and longevity of their properties.

    What Essential Maintenance Tips Do Industry Leaders Recommend for Drainage Systems?

    Long-term maintenance of crawl space drainage systems is vital to ensure ongoing efficiency and protect the home from moisture-related issues. Industry leaders suggest implementing a routine maintenance schedule that incorporates regular inspections and cleaning. Homeowners should aim to inspect at least once a year, though more frequent checks may be warranted after significant weather events.

    During these inspections, it is critical to remove any debris from drainage components such as sump pumps and French drains. This cleaning process helps prevent blockages that can impede water flow and lead to potential flooding in the crawl space. Additionally, professionals recommend that homeowners monitor the condition of vapour barriers, ensuring they remain intact and effective at preventing humidity from entering the crawl space.

    Furthermore, industry experts often emphasize the importance of timely repairs. If any issues are identified during inspections, addressing them quickly can prevent extensive damage and costly repairs down the line. By following these long-term maintenance tips, homeowners in Squamish can effectively manage moisture in their crawl spaces and extend the lifespan of their drainage systems.

    What Influence Does Squamish’s Climate Have on Crawl Space Drainage Solutions?

    Squamish’s unique climate significantly impacts the approach to crawl space drainage solutions. The region experiences a maritime climate characterized by abundant rainfall and fluctuating temperatures, posing challenges for homeowners. Understanding this climate is essential when designing and implementing effective drainage systems that protect properties from moisture intrusion.

    Local experts recommend tailored solutions that account for frequent rains and the specific soil types in the area. For example, using sump pumps and French drains can effectively manage excess water during wet seasons, directing it away from the foundation and minimizing the risk of water damage. Furthermore, utilizing high-quality materials that can withstand the damp conditions common in Squamish is crucial for long-term performance.

    Moreover, climate-adaptive techniques, such as proper excavation and grading, are vital to optimizing drainage performance. By factoring in local weather patterns and soil conditions, homeowners can ensure that their crawl space drainage systems are not only functional but also resilient against environmental challenges posed by Squamish’s climate.

    What Cost-Effective Strategies Can Be Implemented for Crawl Space Drainage in Squamish?

    Implementing cost-effective strategies for crawl space drainage in Squamish requires a thoughtful approach that balances initial investments with long-term savings. Homeowners often benefit from consulting with a professional who can guide them toward the most effective solutions tailored to their specific needs. One effective strategy is to invest in high-quality materials that may have a higher upfront cost but are designed for durability and low maintenance, thereby reducing long-term repair costs.

    Additionally, homeowners are encouraged to consider preventive measures, such as regular inspections and cleaning, to catch potential issues early and avert costly repairs later. By proactively maintaining drainage systems, homeowners can extend their lifespan and ensure continued effectiveness in managing moisture levels.

    Experts also recommend exploring local government incentives for energy-efficient home improvements, which may include funding for drainage system upgrades. These opportunities can help homeowners achieve cost-effective solutions while enhancing their property’s value. Ultimately, a balanced approach that prioritizes quality and ongoing maintenance will yield the best return on investment for homeowners in Squamish.

    What Are the Key Benefits of Crawl Space Drainage?

    How Does Crawl Space Drainage Enhance Overall Home Health and Safety?

    Crawl space drainage is critical for improving a home’s overall health and safety. By effectively managing moisture levels, drainage systems enhance indoor air quality, significantly reducing the risks of mould and allergens. In regions like Canada, where families may be more susceptible to respiratory issues associated with damp environments, ensuring crawl spaces remain dry is vital for residents’ well-being.

    Furthermore, maintaining a dry crawl space contributes to a safer living environment by reducing the risk of structural damage caused by prolonged moisture exposure. This is especially relevant in areas prone to flooding or heavy rainfall, as homes lacking adequate protection can incur significant repair costs and health hazards. Investing in crawl space drainage solutions allows homeowners to take proactive steps to ensure their homes remain safe havens for their families.

    In addition, a well-maintained drainage system fosters a more comfortable indoor atmosphere. By controlling humidity levels, homeowners can enjoy a more pleasant environment devoid of musty odours and the discomfort associated with dampness. This enhancement in living conditions is a significant advantage of having an effective crawl space drainage system in place.

    Why Is Energy Efficiency a Crucial Benefit of Crawl Space Drainage?

    Energy efficiency serves as a major advantage of crawl space drainage systems, as they help maintain optimal indoor conditions. By preventing moisture accumulation, homeowners can decrease their reliance on heating and cooling systems, resulting in lower utility costs. In Canada, where winters can be severe, having a dry crawl space is essential for maintaining effective insulation and comfort during extreme temperatures.

    Moreover, energy-efficient homes tend to have a smaller carbon footprint, aligning with modern environmental priorities. By ensuring crawl spaces are adequately drained and ventilated, homeowners can enhance their property’s overall energy efficiency, contributing to a more sustainable lifestyle. This not only benefits individual homeowners but also supports broader community efforts to conserve the environment.

    Additionally, improved energy efficiency through effective drainage can increase home value. Prospective buyers often perceive properties with efficient drainage systems as well-maintained investments, further enhancing their market appeal. The combination of comfort, cost savings, and enhanced property value makes energy efficiency a compelling reason for homeowners to prioritize crawl space drainage solutions.

    What Is the Impact of Crawl Space Drainage on Property Value and Resale Potential?

    Properly installed and maintained crawl space drainage systems can significantly enhance property value and resale potential. Buyers are increasingly aware of the importance of owning a home protected against water damage, mould, and structural issues. A well-functioning drainage system signals to potential buyers that the home has been well cared for and minimizes future risks associated with moisture intrusion.

    In the competitive Canadian housing market, homes that prioritize effective drainage solutions are often more attractive to buyers. This is particularly true in areas prone to flooding or heavy rainfall, as prospective homeowners are likely to factor in the potential repair costs when making a purchasing decision. By showcasing a reliable crawl space drainage system, sellers can differentiate their property and potentially command a better price.

    Furthermore, properties equipped with effective drainage solutions typically experience fewer issues during home inspections, facilitating a smoother and potentially quicker selling process. Consequently, homeowners who invest in crawl space drainage not only protect their living environment but also boost the long-term value and marketability of their properties.

    Evidence-Based Benefits of Crawl Space Drainage Services

    What Research Supports the Effectiveness of Drainage Systems in Moisture Control?

    Research demonstrates that crawl space drainage systems effectively reduce humidity levels, particularly in moisture-prone areas like Canada. Studies indicate that after installing drainage systems, many homeowners report a significant decrease in indoor humidity, leading to healthier living conditions. This evidence underscores the necessity of integrating drainage solutions into residential settings to mitigate the risks associated with excessive moisture.

    Homeowners can take actionable steps to verify the effectiveness of their drainage systems by monitoring crawl space humidity levels before and after installation. Utilizing hygrometers can provide valuable data, allowing homeowners to assess the impact of the drainage solutions directly. Additionally, conducting routine inspections of the system ensures it continues to perform optimally, maintains low moisture levels, and prevents issues related to dampness.

    By recognizing the importance of effective moisture control, homeowners can make informed decisions regarding their crawl space drainage needs, thereby safeguarding their health and property from potential damage.

    How Does Crawl Space Drainage Contribute to Sustainable Building Practices?

    Crawl space drainage systems align with sustainable building practices by reducing water waste and enhancing resource conservation. In Canada, where environmental considerations are increasingly prioritized, implementing effective drainage solutions supports eco-friendly homeownership. By managing moisture responsibly, homeowners contribute to the overall sustainability of their properties while preserving the surrounding natural environment.

    Research indicates that well-designed drainage systems not only protect homes from water damage but also help minimize the impact of stormwater runoff, which can lead to flooding and erosion in local ecosystems. By directing water away from foundations and into appropriate drainage pathways, homeowners help maintain the health of their landscapes and further promote sustainability.

    Moreover, integrating sustainable materials in the construction of drainage systems, such as recycled or eco-friendly products, enhances their environmental benefits. Homeowners who prioritize these practices contribute to the growing movement towards greener living, positively impacting their communities and the planet.

    What Key Findings Arise from Recent Canadian Studies on Drainage Longevity?

    Recent Canadian studies highlight that well-maintained crawl space drainage systems significantly extend the lifespan of foundations and structural components. Research indicates that properties with effective moisture management experience fewer deterioration issues, resulting in a longer overall lifespan for the building. This emphasizes the value of investing in drainage solutions, particularly in regions like Squamish, where environmental conditions can accelerate wear and tear.

    Additionally, findings suggest that homes equipped with proper drainage systems require less frequent repairs and renovations, offering homeowners greater peace of mind and financial savings over time. By proactively managing moisture levels, homeowners can avoid damage that often necessitates costly foundation repairs, thereby ensuring their property remains a sound investment.

    Understanding these longevity benefits reinforces the importance of crawl space drainage services, encouraging homeowners to prioritize them to protect their investments and achieve lasting value.

    What Is the Impact of Crawl Space Drainage on Energy Efficiency and Cost Savings?

    Studies in Canada indicate that effective crawl space drainage systems improve energy efficiency, resulting in notable cost savings for homeowners. By reducing humidity and preventing water intrusion, these systems help maintain stable indoor temperatures, which lowers heating and cooling demand. This is particularly advantageous during harsh Canadian winters and hot summers when energy consumption can peak.

    Moreover, as energy-efficient homes become increasingly desirable, properties with reliable drainage solutions are more likely to attract potential buyers. This not only enhances marketability but can also lead to higher resale values, making effective drainage a wise financial choice. Homeowners can maximize their return on investment by ensuring that their crawl space drainage systems are well-maintained and functioning optimally.

    By recognizing the dual benefits of cost savings and energy efficiency, homeowners are empowered to take steps toward more sustainable living, ultimately contributing to their overall financial well-being.

    Why Choose Professional Services for Crawl Space Drainage?

    What Qualifications Should You Seek in Drainage Service Providers?

    When selecting service providers for crawl space drainage, it is essential to seek qualifications that guarantee expertise and reliability. Firstly, prioritize providers who have received certified training in drainage systems and possess relevant field experience. This background is crucial to ensuring compliance with Canadian regulations and industry standards, ultimately leading to effective and safe installations.

    Additionally, consider providers who can present a portfolio of past projects, showcasing their expertise and the quality of their work. Positive customer testimonials and reviews can also offer insights into a service provider’s reliability and professionalism. A reputable company will prioritize customer satisfaction and be willing to address questions regarding their methods and materials.

    Furthermore, inquiring about warranties and post-installation support can help ensure homeowners receive the assistance they need if issues arise in the future. By choosing qualified professionals, homeowners can feel confident that their crawl space drainage needs are addressed with the utmost care and expertise, safeguarding their properties from moisture-related problems.

    How Do Professionals Address Complex Installation Challenges?

    Professionals specializing in crawl space drainage excel at navigating complex installation challenges that arise from uneven terrain, soil variability, and other environmental factors. They employ specialized tools and techniques to address these issues effectively. For instance, in regions like Squamish, where soil types can differ significantly, experts assess site conditions to determine the most suitable drainage solutions.

    When confronted with uneven terrain, professionals may implement grading techniques to ensure proper water flow towards the drainage system. They recognize the importance of tailoring solutions to each property’s specific needs, optimizing drainage performance while minimizing disruption to the landscape.

    Moreover, these professionals are well-versed in local building codes and regulations, ensuring their installations comply with safety standards. This expertise prevents complications arising from improperly installed systems, ultimately protecting the homeowner’s investment and ensuring long-term functionality.

    What Are the Risks of DIY Compared to Professional Approaches?

    While DIY projects can be appealing to some homeowners, the risks associated with attempting crawl space drainage installations without professional assistance can be significant. DIY efforts often lead to inadequate sealing of drainage systems, resulting in future leaks and ongoing moisture issues. This undermines the system’s effectiveness and can lead to costly repairs later.

    Additionally, without the necessary expertise, homeowners may overlook critical factors such as soil composition, slope, and local regulations, all of which are vital to a successful installation. Professionals bring extensive knowledge to the table, ensuring that every aspect of the drainage system is optimized for performance and longevity.

    • Inadequate sealing leading to leaks
    • Improper installation causing system failure
    • Failure to comply with local building codes
    • Inability to assess soil and terrain accurately
    • Higher long-term repair costs
    • Potential for mould and structural damage
    • Loss of warranty on materials
    • Increased time and labour costs

    By opting for professional services, homeowners can mitigate these risks and ensure that their crawl space drainage systems are installed correctly and efficiently, providing peace of mind and long-term protection.

    Ensuring Your Crawl Space Remains Healthy After Drainage Installation

    How Often Should Routine Inspections Be Conducted for Optimal Performance?

    Routine inspections are critical for maintaining the effectiveness of crawl space drainage systems. Experts recommend conducting checks at least once a year, although more frequent inspections may be necessary following heavy rainfall or significant weather events. This proactive strategy enables homeowners to monitor their drainage systems’ performance and identify potential issues early.

    During inspections, homeowners should evaluate the condition of drainage components, including sump pumps and French drains. Checking for clogs or blockages is essential, as these issues can hinder the system’s proper functioning. Furthermore, examining vapour barriers and confirming their integrity is vital for preventing moisture from entering the crawl space.

    By adhering to a routine inspection schedule, homeowners can ensure their crawl space drainage systems remain effective, safeguard their homes from moisture-related risks, and support long-term structural integrity.

    What Routine Upkeep Can Extend the Lifespan of Drainage Systems?

    Regular maintenance is essential to prolong the lifespan of crawl space drainage systems. Homeowners can adopt several maintenance practices to ensure their systems operate optimally over time. One of the most critical aspects of upkeep is cleaning filters and removing debris from drainage components such as sump pumps and French drains. This practice prevents clogs and allows water to flow freely, reducing the risk of water buildup in the crawl space.

    Moreover, homeowners should consistently monitor humidity levels in the crawl space. Elevated humidity can foster mould growth and structural issues, so maintaining low levels is vital for preserving the home’s integrity. Regularly inspecting vapour barriers and ensuring they are securely installed is also crucial for preventing moisture infiltration.

    By committing to routine maintenance and remaining proactive, homeowners can significantly extend the lifespan of their crawl space drainage systems, ensuring they continue to protect their homes against moisture-related problems for many years.

    What Signs Indicate That Additional Services Might Be Necessary?

    Recognizing the signs that further services are needed for crawl space drainage systems can help prevent more severe issues. Homeowners should remain vigilant about persistent crawl space dampness, as this suggests the drainage system may not be functioning effectively. Unusual sounds, such as gurgling from sump pumps or water flowing where it shouldn’t, can also signal potential problems that require professional attention.

    If homeowners notice high humidity or a musty odour, it may indicate moisture intrusion that needs to be addressed. Visible signs of mould or mildew signal that humidity levels are too high and that further action is necessary.

    By being proactive in identifying these warning signs, homeowners can ensure they seek professional maintenance services when needed, aligning with Canadian standards for ongoing home care and moisture prevention.

    What Effective Strategies Can Prevent Mould Growth in Crawl Spaces?

    Preventing mould growth in crawl spaces is essential for maintaining a healthy home environment. In Canada, where humidity levels can fluctuate, monitoring moisture is crucial. Homeowners can implement several effective strategies to keep mould at bay. First and foremost, ensuring proper drainage is essential; directing water away from the foundation minimizes moisture accumulation.

    Additionally, applying sealants to the crawl space walls and floors can help create a barrier against moisture intrusion. These sealants work by filling in cracks and preventing water from seeping in. Monitoring humidity levels is also critical; using dehumidifiers can help maintain optimal moisture levels, especially during humid months.

    Regular inspections are necessary to prevent mould growth, as early detection enables immediate action. Homeowners should be proactive in identifying any musty odours or visible mould and respond swiftly to maintain a dry environment.

    When Should You Seek Professional Maintenance Services for Your Crawl Space?

    Knowing when to seek professional maintenance services for crawl space drainage is crucial for homeowners looking to protect their investments. If signs of structural damage or persistent odours are detected, consulting professionals immediately is essential. Structural damage can indicate serious moisture issues requiring expert assessment and remediation, while ongoing odours often signal mould growth or inadequate drainage.

    Additionally, if homeowners notice changes in humidity levels or frequent flooding in the crawl space, they should seek professional assistance. Experts can perform thorough assessments, identifying underlying issues that may not be obvious to the untrained eye. This proactive strategy aligns with national standards, ensuring timely interventions that protect the home’s longevity and safety.

    By recognizing these indicators and acting promptly, homeowners can safeguard their properties and ensure their crawl space drainage systems continue to function effectively over time.

    Frequently Asked Questions About Crawl Space Drainage

    What Is the Purpose of a Crawl Space Drainage System?

    A crawl space drainage system is designed to manage moisture levels by directing water away from the foundation, preventing flooding and structural damage.

    How Can I Determine If My Crawl Space Needs Drainage Services?

    Signs include water pooling, musty odours, mould growth, and increased humidity indoors. Early detection is crucial to avoid costly repairs.

    Are There Various Types of Drainage Systems for Crawl Spaces?

    Yes, common types include sump pumps, French drains, and vapour barriers. Each serves a unique purpose in managing moisture and protecting the foundation.

    How Often Should I Inspect My Crawl Space Drainage System?

    It’s recommended to conduct inspections at least once a year, or more frequently after heavy rainfall or significant weather events.

    What Risks Are Associated with Not Having a Crawl Space Drainage System?

    Without proper drainage, homes are at risk for water damage, mould growth, and structural issues, which can lead to costly repairs and health hazards.

    Is It Possible to Install a Crawl Space Drainage System Myself?

    While some may attempt DIY installations, hiring professionals is advisable to ensure proper installation and compliance with local regulations.

    What Maintenance Is Required for Crawl Space Drainage Systems?

    Regular inspections, component cleaning, and humidity monitoring are essential for maintaining the system’s effectiveness.

    How Do Climate Conditions in Squamish Affect Drainage Needs?

    Squamish’s maritime climate, characterized by frequent rainfall, necessitates effective drainage solutions to prevent moisture accumulation and structural damage.

    What Materials Are Commonly Utilized in Drainage Systems?

    Common materials include PVC pipes and geotextiles, known for their durability and effectiveness in managing water flow.

    How Does Proper Drainage Affect Home Value?

    Effective drainage systems enhance home value by preventing future issues, making properties more appealing to buyers and potentially commanding higher resale prices.

    Join Us on Facebook Now!

    Presented By: Crawl Space Drainage in Squamish

    The Article: Crawl Space Drainage Services in Squamish: Essential Protection for Homes First Published On: https://pacificbluemechanical.ca/

    The Article Crawl Space Drainage Services: Essential Home Protection in Squamish Was Found On https://limitsofstrategy.com

  • DIY Water Purifier: Simple Steps for Purified Water

    DIY Water Purifier: Simple Steps for Purified Water

    Master the Art of Building Your Own Home Water Purifier for Clean Drinking Water

    Understanding the Essentials of a DIY Water Purifier Project

    A homemade water purifier on a rustic table with sand, activated carbon, and ceramic filters, surrounded by DIY tools.

    A DIY Water Purifier represents a creative and practical approach that individuals employ to establish their own water purification systems, ensuring that the drinking water they consume is safe and nutritious. This DIY methodology encompasses a range of techniques and materials that are tailored to tackle various purification challenges in different environments. By gaining a solid understanding of the fundamental principles governing these home systems, users can adapt their solutions based on local water quality, available resources, and specific health needs. From basic sand filters to more sophisticated designs incorporating activated carbon and ceramic filters, a DIY water purifier becomes a versatile solution for acquiring clean and safe drinking water.

    The most significant advantage of a DIY Water Purifier is its flexibility; designs can be modified to tackle environmental challenges and resource limitations. In areas where commercial purification systems are scarce, the DIY approach not only empowers individuals but also promotes self-sufficiency. This has led to a global increase in the practice of building personal water purification systems, crossing geographical and cultural lines. By utilizing locally sourced materials and traditional techniques, people can create effective water purification solutions that cater to their specific circumstances, enhancing access to clean water.

    Discover the Advantages of Crafting Your Own Water Purifier

    Engaging in a DIY Water Purifier project brings an array of benefits, with cost-effectiveness and environmental sustainability being paramount. Commercial water purification solutions can be prohibitively expensive, particularly in underdeveloped regions. Conversely, DIY purifiers can be constructed using low-cost or even readily accessible materials, enabling individuals and communities to obtain safe drinking water without the financial strain tied to commercial options. Moreover, building your own system grants you complete control over the materials and methods employed, fostering eco-friendly practices that contribute to reducing unnecessary plastic waste.

    In addition to financial benefits, participating in DIY water purification offers significant educational opportunities. By constructing these systems, individuals gain a deeper understanding of the issues surrounding water quality and the underlying science of purification techniques. This knowledge empowers communities to make informed decisions regarding their water sources. Furthermore, the independence gained from knowing how to purify water can greatly enhance resilience to challenges such as water scarcity and contamination crises. Overall, DIY water purification serves as a powerful tool for fostering global empowerment.

    Core Principles for Successful Water Purification

    Comprehending the fundamental principles of water purification is essential for the effective design and functioning of DIY systems. The key processes involved include filtration, sedimentation, and disinfection, each critical in ensuring clean drinking water. Filtration entails removing particulate matter from water through barriers that capture debris, sediment, and microorganisms. In DIY setups, layers of sand, charcoal, and gravel are often utilized, acting as natural filters to thoroughly cleanse the water.

    Sedimentation allows denser particles to settle at the bottom of a container, separating them from the clearer water above. This process can be optimized in DIY systems by letting the water sit undisturbed for a set time before further purification steps are taken. Disinfection is vital for eliminating pathogens that may remain after filtration. Various techniques, including boiling, UV light exposure, or using chemical disinfectants, can achieve this. Familiarity with these principles enables DIY enthusiasts to create effective systems tailored to their specific requirements.

    Essential Materials for Your DIY Water Purifier Project

    DIY water purifier with sand, charcoal, gravel, and ceramic layers, filtering muddy water in a rustic workshop.

    When starting a DIY Water Purifier project, selecting suitable materials is crucial for achieving effective purification. Commonly used materials include sand, charcoal, gravel, and ceramic, each providing unique characteristics that enhance the purification process. Sand serves as the primary filtration medium, effectively capturing larger particles and sediments, while activated charcoal plays a vital role in removing impurities and improving water taste. Gravel is typically used as a foundational layer to assist with drainage and strengthen the filter’s structure.

    Ceramic filters are another valuable component, providing a barrier that effectively removes bacteria and protozoa, making them especially beneficial in areas where such contaminants are prevalent. By combining these materials in layered configurations, users can optimize the purification process, leading to cleaner, safer drinking water. Additionally, sourcing materials locally not only cuts costs but also reduces environmental impact, aligning with sustainable practices. As individuals embark on DIY projects, they can customize their filters to address local water quality challenges.

    Insights from Experts on DIY Water Purifiers

    Motivating Success Stories of DIY Water Purifiers

    Globally, there are countless inspiring examples of effective DIY water purifiers that highlight the success of simple yet innovative solutions. For instance, communities in rural India have effectively employed sand and charcoal filters to purify water sourced from polluted rivers, resulting in a significant reduction in waterborne diseases. Similarly, in various African regions, households have built low-cost ceramic filters using locally sourced clay, thereby improving access to safe drinking water.

    • Sand and charcoal filters in rural India significantly reduce contaminants.
    • Ceramic filters crafted from local clay in Africa improve water quality.
    • Community initiatives in South America employ biosand filters for safe drinking water.
    • Simple UV-based systems have been developed in Southeast Asia for pathogen removal.
    • Rainwater harvesting systems combined with DIY filters in Australia promote sustainability.
    • Mobile filtration units created in conflict zones offer immediate relief.
    • Repurposed plastic bottles are used for filtration in disaster relief efforts worldwide.
    • Educational programs in the Philippines empower locals to construct effective DIY systems.

    These real-world narratives not only demonstrate the accessibility of DIY water purification methods but also their adaptability to local contexts. Each story underscores how communities can effectively and sustainably address their unique water challenges. These success stories exemplify human creativity and highlight the potential of DIY water purifiers to significantly impact public health and well-being.

    Identifying Common Challenges in DIY Water Purifier Projects

    Person assembling DIY water purifier with global landscapes, showing material sourcing challenges.

    While the DIY Water Purifier approach offers immense potential, it does come with specific challenges. One of the most pressing concerns is sourcing reliable materials. In many locations, access to essential components necessary for effective filtration can be inconsistent or limited. This scarcity may lead to inadequate purification results if the materials used are not suitable for the specific contaminants present in the water. Consequently, understanding the local water quality and ensuring the availability of appropriate materials is critical to achieving successful outcomes.

    Another prevalent challenge involves maintaining consistent purification efficiency. Over time, the materials utilized in a DIY system may become saturated or contaminated, necessitating regular upkeep and replacement. Without proper attention, the filtration system may lose effectiveness, potentially posing health risks. Additionally, many individuals may lack the technical knowledge required to optimize their designs or troubleshoot issues encountered during operation. Fortunately, workshops and educational programs can provide guidance and support, equipping DIY enthusiasts to effectively navigate these challenges.

    Enhancing DIY Water Purification Techniques with Expert Guidance

    Experts play a crucial role in advancing DIY water purification methods through research and the development of innovative materials and designs tailored to meet specific environmental conditions. For instance, advancements in nanotechnology could yield filters that are more efficient at removing contaminants at a molecular level. Furthermore, educating individuals about best practices for water purification—including routine monitoring, maintenance, and testing—can significantly enhance the performance of DIY systems.

    Collaboration between scientists and local communities can also inspire innovative solutions. By understanding the unique challenges faced by various populations, experts can provide targeted recommendations and designs that address local water quality issues. Such partnerships not only improve the reliability of DIY purifiers but also foster a sense of ownership and accountability within communities. Ultimately, experts can bridge the gap between scientific knowledge and practical applications, empowering individuals to develop effective and sustainable water purification solutions.

    Exploring the Comprehensive Benefits of DIY Water Purifiers

    The advantages of DIY water purifiers extend far beyond mere cost savings. Primarily, they empower individuals and communities with a sense of autonomy over their water quality. By constructing their purification systems, users take charge of their health and well-being. Additionally, these systems often utilize locally sourced materials, making them accessible to a diverse range of people, regardless of their socioeconomic status.

    Moreover, the educational value inherent in constructing a DIY purifier cannot be overstated. Engaging in the process fosters a deeper understanding of water quality issues and the science underlying effective purification techniques. This knowledge leads to informed decision-making and proactive approaches to water management. Environmentally, DIY systems promote sustainability by reducing reliance on bottled water and minimizing energy-intensive purification methods. Overall, the DIY approach aligns with a growing global movement toward self-sufficiency and environmental responsibility.

    Materials and Tools Needed for Your DIY Water Purifier

    Identifying Key Materials for Your DIY Water Purifier Project

    Creating an efficient DIY Water Purifier project necessitates a variety of essential materials to ensure effective filtration and purification. Fundamental components typically include sand, charcoal, gravel, and containers. Sand acts as the primary filtration medium, effectively removing larger particles and sediments from the water. When selecting sand, it is crucial to choose the correct grain size to optimize filtration effectiveness.

    Charcoal, particularly activated charcoal, is indispensable due to its ability to adsorb chemicals, impurities, and odors, thereby enhancing both the taste and safety of the water. Additionally, gravel is essential for drainage and structural reinforcement within the filtration system. By layering these materials appropriately, users can augment the purification process and produce cleaner water. Some DIY systems may also incorporate additional materials, such as ceramic filters or mesh screens, to refine the filtration process even further. Ultimately, the selection of materials should be guided by the specific water quality challenges encountered in a given area.

    Essential Tools for Constructing Your DIY Water Purifier

    Equipping yourself with the right tools is vital for the successful assembly of a DIY water purifier. Basic tools generally include drills, saws, measuring instruments, and containers. Drills are necessary for making openings in containers, facilitating proper water flow and drainage. Saws may be needed to cut materials to the correct dimensions, ensuring that all components fit together securely.

    Measuring tools such as rulers and measuring cups are essential for ensuring that the layers of materials are proportioned accurately, maximizing the effectiveness of the filtration system. Furthermore, having safety equipment like gloves and goggles is crucial to protect oneself while handling tools. By arming themselves with the necessary tools and safety gear, individuals can confidently embark on DIY water purification projects, achieving successful outcomes.

    Where to Source Materials for Your DIY Water Purifier Project

    Finding reliable sources for DIY Water Purifier materials is essential for anyone looking to build their purification systems. Common sourcing options include local hardware stores, which typically offer vital components like sand, charcoal, and gravel. Additionally, online marketplaces provide a convenient platform for purchasing specific materials that may not be readily available in physical stores. Repurposing and reusing household items can also be an effective way to source materials, such as utilizing old plastic containers for the purification system.

    Community initiatives or local NGOs often organize workshops or supply drives, offering materials for DIY water projects and promoting collaboration and knowledge sharing among participants. Building connections within the community can reveal alternative sourcing options and facilitate the pooling of resources for larger projects. By exploring these various avenues, individuals can ensure they have the necessary materials to create effective and sustainable water purification systems.

    Preparing Materials for Your DIY Water Purifier Project

    Properly preparing materials for a DIY Water Purifier project is a crucial step that ensures optimal filtration performance. This preparation typically involves cleaning and sizing materials such as sand, charcoal, and gravel. For sand, it is essential to wash it thoroughly to eliminate any dust or impurities that could compromise the final water output. Rinsing sand under running water can help achieve the necessary clarity and effectiveness.

    Charcoal, especially when utilizing activated charcoal, should also be cleaned to remove any fine dust that may negatively impact water quality. Sifting through gravel ensures that larger stones or debris are eliminated, promoting better drainage and flow within the filtration system. After cleaning, materials should be appropriately sized, as varying grain sizes can influence filtration efficiency. Proper preparation not only enhances the purification process but also promotes the longevity and reliability of the DIY water purifier.

    Implementing Safety Measures When Working on Your DIY Water Purifier

    Prioritizing safety during the construction of a DIY Water Purifier system is essential. First and foremost, individuals should always wear protective gear, such as gloves and goggles, to minimize the risk of injury while handling tools and materials. Many of the materials involved can be abrasive or harmful upon contact with skin or eyes, making these precautions critical.

    Additionally, it is important to work in a well-ventilated area, especially when using materials that may produce dust or fumes. Keeping tools organized and maintaining a clean workspace can help prevent accidents and mishaps during construction. Finally, closely following assembly instructions and ensuring all components are securely fitted will mitigate any risks associated with a poorly constructed system. By adhering to these safety precautions, individuals can confidently build their DIY water purifiers while minimizing the risk of injury or accidents.

    A Comprehensive Step-by-Step Guide to Building Your Water Purifier DIY

    Properly Assembling the Core Components of Your DIY Water Purifier

    Assembling the core components of a DIY water purifier requires a systematic approach to layering materials that facilitate effective filtration. To start, select a suitable container, such as a large plastic bottle or bucket, which will serve as the filtration unit. Begin by drilling holes at the bottom to allow for drainage; this ensures that water flows through the filter when poured.

    Next, create a gravel layer at the base, approximately one to two inches thick, to provide structural support and initial filtration. Above this gravel layer, add a thicker layer of sand, ideally five to six inches, which will trap larger particles and sediments. Finally, cap off the sand with a layer of activated charcoal, around two to three inches thick, essential for removing impurities and chemical contaminants. Each layer should be gently packed down to create a stable filtration system. This layered structure optimizes water flow, ensuring that all contaminants are effectively captured during the filtration process.

    • Select an appropriate container and drill drainage holes at the bottom.
    • Incorporate a gravel layer (1-2 inches) for structural support.
    • Add a sand layer (5-6 inches) above the gravel for sediment filtration.
    • Top with activated charcoal (2-3 inches) for chemical purification.
    • Ensure each layer is evenly distributed and compressed.
    • Cover the top of the filter to prevent contamination.
    • Insert a clean collection container to gather the purified water.
    • Allow the system to rest for a few hours before use to ensure stability.

    After assembling these components, it is essential to test the system before regular use. By pouring contaminated water through the filter, users can assess the clarity and quality of the output, allowing for necessary adjustments if required. This hands-on experience not only empowers individuals to create effective purification systems but also enhances their understanding of water quality management.

    Testing and Optimizing Your DIY Water Purifier

    Testing and optimizing your DIY water purifier is crucial to ensure that it operates effectively and delivers safe drinking water. Start by collecting a sample of water from the source you intend to purify. Pour this water through your DIY system and observe the clarity and odor of the filtered output. Noticing changes can indicate how well the system is functioning and whether adjustments are necessary.

    One effective strategy for optimizing the purification process is to experiment with different material combinations or ratios. For instance, if the water remains cloudy after filtration, increasing the sand layer or incorporating a finer grade might enhance filtration efficiency. Monitoring the flow rate is also critical; if water drains too slowly, it may suggest that the layers are too dense or that the materials need cleaning or replacement.

    Regular testing of the purified water for microbial contamination or chemical residues can provide further insights into the system’s effectiveness. Utilizing simple water testing kits can assist users in evaluating the safety of their drinking water. Through consistent testing and optimization, individuals can ensure reliable, high-quality water purification tailored to their specific needs.

    Maintenance Tips for Your DIY Water Purifier

    Regular maintenance of a DIY water purifier is vital for ensuring its durability and effectiveness. A primary maintenance task involves cleaning the filtration materials periodically. Over time, sand, charcoal, and gravel can become saturated with contaminants, leading to reduced filtration efficiency. To maintain optimal performance, users should replace or clean these components regularly, typically every few months, depending on usage and water quality.

    Moreover, it is crucial to monitor the overall integrity of the purifier. Inspect for any cracks or damage in the container, as these issues can result in leaks or contamination of the purified water. Cleaning the collection container is also necessary to prevent the buildup of bacteria. Users should ensure that their purifier remains covered to avoid external contamination from dust or debris.

    Additionally, maintaining effective water testing practices is vital. Regularly analyzing the output water for contaminants can help users determine when maintenance is necessary. By following these maintenance strategies, individuals can ensure their DIY water purifiers operate effectively, providing safe drinking water over extended periods.

    Selecting the Optimal Materials for Your DIY Water Purifier

    Choosing the right materials for a DIY water purifier is critical to its overall efficiency and reliability. First, consider the quality of water that requires purification. For example, if the source water contains high levels of sediments or larger particulates, a coarser sand or gravel may be necessary to effectively capture these contaminants. Conversely, for water with chemical impurities, activated charcoal is essential, as it has proven effective in adsorbing various harmful substances.

    In addition to sand and charcoal, the type of container used also impacts the efficiency of the purification process. Clear plastic containers allow sunlight to penetrate, which can assist in disinfection through solar treatment if sunlight is available. Furthermore, if the water source is known to be biologically contaminated, incorporating ceramic filters can provide an additional layer of protection against bacteria and protozoa.

    The ultimate goal is to create a balanced filtration system that addresses specific water quality issues. Assessing local water sources, understanding contaminants, and selecting appropriate materials can significantly improve the effectiveness of a DIY water purifier. By doing so, individuals can ensure access to safe drinking water while promoting sustainable practices.

    Key Safety Precautions When Building and Using a DIY Water Purifier

    Ensuring safety while constructing and using a DIY water purifier is essential to minimize potential health hazards. First, individuals should always wear protective gear, including gloves and goggles, when handling tools and materials. This precaution helps prevent injuries from sharp objects and exposure to dust or harmful substances.

    When assembling the purifier, it is crucial to use clean materials to avoid introducing contaminants into the system. Ensure that all components are thoroughly cleaned and dried prior to assembly. During use, avoid tap water if its quality is uncertain; instead, test the source water first to evaluate contaminants. If unsure, boiling the water before it enters the purifier can provide an additional layer of disinfection.

    After construction, monitoring the purifier’s performance is critical. Keep the purifier covered when not in use to prevent contamination from external sources. Regularly check the output water quality and be prepared to clean or replace filtration materials as necessary. By adhering to these safety precautions, individuals can confidently construct and utilize their DIY water purifiers while minimizing health risks.

    Research-Backed Benefits of DIY Water Purification

    Implement Effective Strategies to Maximize the Advantages of DIY Water Purification

    To fully capitalize on the benefits of DIY Water Purifier, individuals should adopt several actionable strategies throughout the process. Begin with thorough research on local water quality challenges and identify the specific contaminants present in your water source. This information will guide the selection of suitable materials and purification techniques tailored to your needs.

    Regular maintenance also plays a crucial role; clean and replace filtration materials as needed to sustain efficiency. Additionally, engage in routine water testing using simple kits to monitor the quality of the output water. This practice not only provides peace of mind but also helps identify any necessary adjustments to the purification system.

    Participating in community initiatives can further enhance your DIY efforts. By joining workshops, you can learn from experts and share knowledge with others. Lastly, consider documenting your process and experiences, as this can provide valuable insights for others looking to build their systems and foster a collaborative learning environment.

    Health Advantages Associated with DIY Water Purification

    Utilizing a DIY Water Purifier system can yield significant health benefits by effectively removing harmful contaminants from drinking water. This includes the eradication of bacteria, viruses, and protozoa that can lead to waterborne diseases, thereby contributing to improved public health outcomes. Furthermore, the removal of heavy metals and hazardous chemicals enhances water safety, reducing the risk of long-term health complications associated with consuming contaminated water.

    An improved taste and odor resulting from effective purification processes can also encourage better hydration habits. When water is clean and palatable, individuals are more likely to consume adequate amounts, supporting better overall health. Additionally, the assurance of water safety contributes to mental well-being, alleviating concerns regarding water quality. In summary, DIY water purification systems serve as an accessible means to enhance health through improved water quality.

    Analyzing the Environmental Impact of DIY Water Purification

    The environmental impact of utilizing DIY Water Purifier methods is overwhelmingly positive. By creating homemade purification systems, individuals can significantly decrease their reliance on bottled water, thereby addressing the plastic waste crisis. The production and disposal of plastic bottles contribute to environmental degradation, and employing DIY methods fosters sustainability by minimizing waste.

    Moreover, DIY systems often rely on locally sourced materials, resulting in a smaller carbon footprint compared to commercial water purification systems that require extensive manufacturing and transportation. Implementing natural filtration techniques aligns with eco-friendly practices, promoting a more sustainable approach to water management. Overall, adopting DIY water purification contributes to healthier ecosystems and encourages environmental stewardship, motivating communities to engage in sustainable practices that benefit both people and the planet.

    Innovative Techniques in DIY Water Purification

    Expert Insights on Advanced Filtration Techniques

    Within the realm of DIY water purification, various advanced filtration methods can significantly enhance the effectiveness of homemade systems. Reverse osmosis is one such technique that utilizes a semipermeable membrane to eliminate a wide range of contaminants, including salts and heavy metals. Although typically more complex to implement in DIY settings, adaptations of this technology can be explored for those willing to invest time and resources.

    Ultraviolet (UV) purification is another advanced approach that employs UV light to destroy or inactivate pathogens found in water. Incorporating UV disinfection into a DIY system can provide an additional layer of safety, especially in areas experiencing high biological contamination. Utilizing solar-powered UV lamps can make this method particularly accessible for off-grid communities.

    Ion exchange is also noteworthy, particularly for removing hardness ions and heavy metals from water. This process involves exchanging harmful ions in water for less harmful ones, significantly improving water quality. While ion exchange typically requires commercial resin materials, creative DIY solutions can be developed to adapt this technique for home applications. Overall, incorporating these advanced methods can elevate DIY water purification systems to higher levels of efficiency, ensuring access to clean and safe drinking water.

    Integrating Multiple Purification Techniques into a Single DIY System

    Combining multiple purification techniques into one DIY water purifier can greatly enhance the overall efficacy of the system, providing comprehensive treatment for various contaminants. A successful strategy begins with layering different filtration materials; for instance, one might start with a gravel layer for heavy sediments, followed by sand for finer particles, and then activated charcoal for chemical removal. This approach not only captures a wide array of contaminants but also optimizes the unique properties of each material.

    In addition, incorporating supplementary methods, such as UV purification or chemical disinfection, can further enhance water safety. For example, after the water passes through the filtration layers, exposing it to UV light for a set duration can effectively eliminate any remaining pathogens. Alternatively, adding a small amount of chlorine or iodine to the filtered water can provide additional disinfection, although it is essential to ensure proper dosing.

    Ultimately, the objective is to create a robust purification system capable of addressing various water quality challenges. By thoughtfully integrating multiple purification methods, DIY enthusiasts can ensure a higher level of water safety and quality, making their systems resilient against a broad spectrum of contaminants.

    Future Prospects in DIY Water Purification

    The future of DIY Water Purifier initiatives appears promising, characterized by innovative designs and materials that enhance accessibility and efficiency. One significant trend is the emergence of smart technology, enabling users to monitor water quality and purification performance in real-time. Incorporating sensors and mobile applications can provide valuable insights, assisting users in making informed decisions regarding maintenance and system adjustments.

    Furthermore, advancements in materials science may lead to the development of more efficient filtration media, such as nanofilters or biodegradable options, which reduce environmental impact while enhancing purification effectiveness. Portable and compact designs are gaining traction, making it easier for individuals and communities to access safe drinking water, regardless of their living situations.

    As awareness of global water issues continues to expand, DIY water purification initiatives may evolve to include educational programs that empower individuals with the knowledge and skills needed to address local water challenges. This community-focused approach will not only encourage innovation but also promote sustainable practices, ultimately contributing to a healthier planet.

    Frequently Asked Questions About DIY Water Purification

    What Materials Are Best for DIY Water Purification?

    The most effective materials for DIY water purification typically include sand, activated charcoal, and gravel, as they are adept at removing impurities, sediments, and contaminants through various filtration processes.

    How Often Should I Replace the Materials in My DIY Water Purifier?

    Materials in a DIY water purifier should generally be replaced every few months, depending on usage and local water quality. Regular maintenance is vital for optimal performance and safety.

    Can My DIY Water Purifier Treat All Types of Water Sources?

    While DIY water purifiers can treat many water sources, it is essential to align the system with the specific contaminants present in the water to ensure effective purification.

    Is Drinking Water from a DIY Purifier Safe?

    Yes, water from a properly constructed and maintained DIY purifier can be safe to drink, provided that it effectively removes harmful contaminants and is regularly tested for quality.

    What Signs Indicate That My DIY Water Purifier Needs Maintenance?

    Indicators that maintenance is required include slow water flow, cloudy output, unusual odors, or visible contaminants in the purified water, indicating that materials may need cleaning or replacement.

    Can I Combine Different Purification Methods in My DIY System?

    Yes, integrating various purification methods, such as sand filtration with UV disinfection, can enhance the overall effectiveness of a DIY water purifier and address a broader array of contaminants.

    What Safety Precautions Should I Take While Constructing a DIY Water Purifier?

    When building a DIY water purifier, always wear protective gear such as gloves and goggles, operate in a well-ventilated area, and ensure all materials are clean to prevent contamination.

    How Can I Test the Water Quality from My DIY Purifier?

    Water quality from your DIY purifier can be tested using simple home testing kits that measure contaminants like bacteria, pH levels, and chemical residues, ensuring the water is safe for consumption.

    Are DIY Water Purifiers Environmentally Friendly?

    Yes, DIY water purifiers are often environmentally friendly, as they reduce reliance on bottled water and utilize locally sourced materials, minimizing waste and carbon footprint.

    Where Can I Find Resources to Help Me Build a DIY Water Purifier?

    Resources for building a DIY water purifier can be found through online tutorials, community workshops, or educational platforms that focus on water sustainability and purification techniques.

    Connect with us on X for more insights!

    The post DIY Water Purifier: Simple Steps to Clean Water appeared first on Survival Bite.

    The Article DIY Water Purifier: Easy Steps for Clean Water Was Found On https://limitsofstrategy.com

  • Homemade Water Purifiers: DIY Solutions You Can Try

    Homemade Water Purifiers: DIY Solutions You Can Try

    Unlocking the Secrets of Effective Water Purification Techniques for Safe Drinking Water

    Water purification is essential for sustaining life, yet a staggering number of individuals worldwide face challenges in accessing clean and safe drinking water. The value of homemade water purifiers becomes evident as they offer dependable solutions during critical situations. By delving into the fundamental principles of water purification, you can start creating effective DIY solutions that guarantee the safety of the water consumed by you and your family each day. This knowledge not only empowers individuals to take charge of their water quality but also promotes a healthier lifestyle overall.

    Diving Deeper into Water Purification: Essential Concepts and Techniques You Should Know

    Homemade Water Purifiers: A clear glass of pure water with visible filtration stages and homemade purifiers in the background.

    Water purification encompasses a series of processes aimed at eliminating contaminants from water, ensuring it is safe for consumption and various applications. This vital practice can integrate a range of physical, chemical, and biological techniques designed to eradicate impurities and guarantee water safety. Understanding these processes is crucial for anyone interested in crafting their homemade water purifiers. By familiarizing yourself with the core principles of water purification, you can implement DIY solutions that effectively cleanse your water, ensuring it is both safe and potable for daily use.

    To fully appreciate the concept of water purification, it’s essential to explore the various methods at your disposal. For instance, filtration serves as a potent technique that eliminates physical particles and microorganisms from water, while chemical treatments are aimed at eradicating bacteria and viruses. The effectiveness of these approaches often hinges on the specific contaminants present in the water source. For example, sediment filtration may suffice for larger particles, but additional strategies may be necessary to tackle bacteria and harmful chemicals effectively, ensuring comprehensive water safety for all users.

    For individuals residing in regions with unreliable water sources, the capacity to create a trustworthy homemade water purifier can truly be a matter of life and death. Whether you find yourself traversing remote terrains or dealing with the aftermath of a natural disaster, having the skills to purify water effectively guarantees that you and your loved ones remain hydrated and healthy during challenging times. This knowledge empowers individuals to take proactive measures in ensuring their water safety, fostering resilience and independence.

    Identifying Common Contaminants Found in Various Water Sources

    Water sources can contain a wide range of contaminants that pose serious health risks to consumers. Common offenders include bacteria, viruses, chemicals, and heavy metals. Recognizing these contaminants is essential for anyone designing their homemade water purifiers, as each type requires a specific approach to ensure effective removal and safety.

    Bacteria and viruses are among the most significant threats to water safety. Pathogens like E. coli and Giardia can infiltrate water supplies, primarily due to fecal contamination. These microorganisms can lead to various gastrointestinal illnesses and other severe health issues if ingested. Traditional purification methods such as boiling water or using chlorine can effectively eliminate these dangerous threats when applied correctly, thereby safeguarding public health.

    Chemical contaminants, including pesticides and heavy metals like lead and mercury, along with industrial pollutants, can severely compromise drinking water quality. These substances often necessitate more advanced purification techniques, such as activated charcoal filtration, to achieve effective removal. Heavy metals are particularly concerning in urban settings, where industrial waste may contaminate local water supplies, making it essential to address these issues adequately for the safety of the community.

    Ingeniously designed homemade water purification systems can specifically target these contaminants. For instance, incorporating activated charcoal into your system can assist in eliminating harmful chemicals, while employing appropriate filtration techniques can effectively remove bacteria and viruses. By recognizing these threats, individuals gain better insight into customizing their purification processes, ultimately enhancing the quality of the water they rely on for their daily needs.

    The Critical Role of Water Purification in Promoting Health and Well-Being

    Access to clean water is fundamental for sustaining human health and overall well-being. The significance of water purification becomes even more pronounced in regions grappling with water scarcity or pollution challenges. By utilizing homemade water purifiers, individuals can take proactive measures to ensure their water safety instead of relying solely on commercial alternatives, which may be costly or hard to find.

    In numerous parts of the world, particularly in developing regions, securing clean drinking water remains a significant hurdle. According to the <a href="https://survivalbite.com/city-sanitation-solutions-a-comprehensive-approach/">World Health Organization</a>, over 2 billion people live in countries experiencing high water stress. In such circumstances, homemade water purifiers serve as a cost-effective and accessible means of securing potable water for everyday use and survival, thus enhancing overall health outcomes.

    Moreover, DIY purification methods empower individuals with essential knowledge and skills that can prove invaluable during emergencies. Whether faced with a natural disaster, a community crisis, or simply in need of clean water while traveling, the ability to create effective purifiers can make a significant difference. By prioritizing safety through personal initiative, individuals contribute to healthier communities and an overall improved quality of life.

    Essential Components for Crafting Your Own Water Purifiers

    A homemade water purifier setup with sand, charcoal, cotton cloth, and chemical agents on a rustic table.

    Creating an effective homemade water purifier begins with a thorough understanding of the materials necessary for construction. Choosing the right materials can significantly enhance the purification process, guaranteeing the production of safe drinking water. This section will explore natural filtration materials, commonly available household items that can be repurposed, and chemical purification agents that can support your water purification endeavors.

    Utilizing Natural Filtration Materials for Maximum Purification Efficiency

    Natural filtration materials such as sand, charcoal, and gravel are indispensable components in building a highly effective homemade water purifier. These materials are typically easy to acquire and can be employed in various combinations to achieve optimal purification results, making them ideal for DIY projects.

    Sand acts as a highly efficient medium for removing larger particles from water, serving as the first line of defense in any filtration system. When layered appropriately, sand can trap sediments and debris, allowing cleaner water to flow through. Activated charcoal, in particular, is an incredibly effective adsorbent that can significantly reduce chemicals, odors, and even impurities that cause discoloration in water. By combining sand and charcoal in your filtration setup, you can greatly enhance the purification process’s effectiveness.

    Gravel serves a crucial supportive role in the filtration system. Acting as a foundational layer beneath sand and charcoal, it helps maintain the structural integrity of the filter while facilitating water flow. When constructing your homemade water purifier, the arrangement and proportion of these materials are vital for ensuring maximum efficiency. A typical setup may involve gravel at the bottom, followed by a layer of sand and topped with activated charcoal. This layered approach not only filters water physically but also facilitates chemical adsorption, providing a thorough purification process.

    Innovatively Repurposing Common Household Items to Enhance Filtration

    Repurposing everyday household items can introduce a creative dimension to your homemade water purifiers. Many commonplace materials can serve as effective filters, offering a sustainable alternative to commercial products while promoting environmental consciousness.

    Cotton and cloth make excellent choices for the initial stages of filtration. They can function as a sieve to capture larger particles before water passes through finer layers. Coffee filters are also effective for removing sediment and debris, making them an ideal addition to improve filtration. Utilizing these materials not only reduces waste but also fosters innovative solutions in water purification.

    An additional inventive approach is to use plastic bottles. By cutting off the bottom of a bottle and inverting it, you can create a funnel-like structure. Filling this makeshift filter with layers of sand, charcoal, and gravel results in a functional filtration system that efficiently produces cleaner water for drinking.

    Employing these household items not only enhances your ability to create effective homemade water purifiers but also promotes sustainability through waste reduction. In an era where environmental awareness is increasingly important, utilizing materials you already possess can lead to positive outcomes in your water purification efforts.

    Integrating Chemical Purification Agents for Enhanced Water Safety

    Person adding bleach to water, timer set for 30 minutes, for chemical purification.

    In emergency scenarios, certain chemical purification agents can be crucial for ensuring water safety. Understanding the proper application of substances like bleach and iodine can significantly bolster the effectiveness of homemade water purifiers.

    Unscented household bleach serves as a powerful disinfectant. When added to water in the appropriate proportions, it effectively eliminates bacteria, viruses, and parasites. However, it’s vital to allow the treated water to sit for a minimum of 30 minutes before consumption, ensuring that the bleach has had adequate time to eradicate any pathogens present, thus safeguarding health.

    Iodine is another effective option, often found in water purification tablets. It can successfully eliminate harmful microorganisms within approximately 30 minutes. However, prolonged consumption of iodine-treated water may not be suitable for everyone, particularly pregnant women or individuals with thyroid issues, requiring careful consideration during use.

    Incorporating these chemical agents alongside your homemade water purifiers adds an important layer of protection, particularly when the source water is heavily contaminated. By understanding the correct application of these substances, you can greatly enhance your water purification efforts, ensuring the water you consume is safe and clean.

    Leveraging Solar Water Disinfection: Harnessing Natural Energy for Eco-Friendly Purification

    Harnessing the sun’s energy offers a simple, eco-friendly approach to water purification. Solar water disinfection (SODIS) is a method that utilizes UV radiation from sunlight to eliminate pathogens in water. Implementing this technique can have a profound impact in resource-limited areas, offering a sustainable solution for water safety.

    The SODIS method requires clear, transparent plastic bottles filled with water. When exposed to direct sunlight for a minimum of six hours, UV rays penetrate the water, effectively reducing harmful microorganisms and pathogens. This technique is particularly beneficial in tropical regions where sunlight is abundant and easily harnessed for water purification.

    Another innovative strategy involves constructing solar stills. These devices can be created from simple materials, allowing you to capture evaporated water, which condenses on a cooler surface and drips into a clean container. This method not only purifies the water but also concentrates any salts or heavy metals present, providing a valuable solution for various water sources.

    Incorporating solar disinfection into your homemade water purifiers enhances the sustainability of your purification efforts while reducing dependency on chemical agents. Learning how to leverage natural resources for water safety empowers individuals and communities worldwide, fostering a greater sense of self-reliance and environmental responsibility.

    Step-by-Step Guide to Assembling Your Own Water Purifier

    Building your homemade water purifier can be an incredibly rewarding endeavor, allowing you to customize the purification process to meet your specific needs. This section provides detailed instructions on assembling various types of purifiers, empowering you to effectively and efficiently ensure access to safe drinking water.

    Creating a Basic Sand and Charcoal Filter for Effective Purification

    Constructing a sand and charcoal filter is a straightforward process that combines natural materials for efficient water purification. This DIY project requires minimal materials and can be accomplished using basic tools, making it accessible for most individuals seeking to ensure safe water access.

    Start by gathering your materials: a clean plastic container, sand, gravel, activated charcoal, and cloth or coffee filters. Begin by cutting the bottom off the plastic container. Place a layer of gravel at the bottom to facilitate drainage and prevent clogging. Next, add a layer of sand on top of the gravel, which will effectively filter out larger particles and sediments, ensuring that the water remains clear.

    Now, it’s time to incorporate the activated charcoal. This potent adsorbent will capture chemicals and impurities suspended in the water, enhancing safety. Pour a thick layer of activated charcoal over the sand. Finally, cover the top with a cloth or a coffee filter to prevent debris from entering the filter system, ensuring a clean water output.

    To utilize your newly constructed homemade water purifier, pour the water slowly through the opening. Collect the filtered water from the bottom, ensuring that it has passed through all layers of filtration. This simple yet effective filter can be a lifesaver in regions with questionable water sources, providing safer drinking water for you and your loved ones.

    Designing an Effective Solar Water Disinfection System for Purification

    Solar water disinfection (SODIS) systems present an efficient and environmentally friendly method for purifying water using sunlight. Developing this approach requires minimal resources and technical knowledge, making it an accessible option for many individuals seeking clean drinking water.

    Begin by gathering clear plastic bottles, ideally 1 or 2 liters in size. Fill each bottle with water, ensuring that some air space remains at the top. The water must be as clear as possible; cloudy water may reduce the effectiveness of the SODIS process. This step is crucial for achieving optimal disinfection results.

    Once filled, position the bottles in direct sunlight, preferably on a reflective surface to enhance UV exposure. The bottles should be exposed to sunlight for at least six hours; however, longer exposure is advisable during overcast days to ensure that all pathogens are effectively eliminated. After this duration, the water should be safe to drink, providing a sustainable solution for accessing clean water.

    This method is particularly advantageous in regions with abundant sunlight. Not only does it effectively purify water, but it also encourages sustainable practices by leveraging renewable energy. The simplicity of homemade water purifiers, such as the SODIS system, empowers communities to take control of their water safety and enhance their overall health and well-being.

    Constructing a Multi-Layer Filtration Unit for Advanced Water Purification

    For those seeking a more sophisticated solution, assembling a multi-layer filtration unit can dramatically enhance water purification capabilities. This advanced system enables the removal of a broader range of contaminants, ensuring higher water quality and safety for consumers.

    Begin by acquiring multiple containers to serve as your filtration layers. Utilize the same materials as before: gravel, sand, and activated charcoal. Start by layering gravel at the bottom of one container, followed by a substantial layer of sand, and lastly, a thick layer of activated charcoal to maximize filtration efficiency and ensure comprehensive purification.

    Next, position another container beneath to collect the filtered water. As water flows through each layer, it undergoes multiple purification processes, significantly improving overall water quality. Ensure that each layer is sufficiently thick to provide effective filtration, allowing contaminants to be captured efficiently.

    To further enhance the system’s efficiency, consider adding additional materials such as crushed shells or coconut husks, which can provide specialized filtration to remove specific contaminants. By creating a highly effective homemade water purifier tailored to your unique needs, you can dramatically improve your water quality and safety, ensuring peace of mind for you and your family.

    Completing this advanced filter not only enhances your water quality but also serves as an educational project. Understanding the materials and processes involved in constructing a multi-layer filtration unit can empower individuals, particularly in communities with limited access to clean water, to take charge of their health.

    Crucial Maintenance and Safety Guidelines for Your Water Purifiers

    Maintaining your homemade water purifiers is essential for ensuring their effectiveness and longevity. Regular upkeep, adherence to safety precautions, and effective troubleshooting can significantly enhance your purification efforts and help maintain consistent water quality.

    Establishing a Routine for Cleaning and Material Replacement

    To ensure the durability and functionality of your homemade water purifiers, regular cleaning and material replacement are vital components of maintenance. Over time, filters can become clogged with contaminants, significantly reducing their effectiveness. Cleaning should be undertaken consistently, particularly if the filter is used frequently, to guarantee optimal performance.

    Start by disassembling your filter and rinsing the components with clean water. Gently scrub the inner surfaces to eliminate any residual contaminants. Pay special attention to the activated charcoal layer, as it can become saturated and lose its filtering capability over time, necessitating regular replacement to maintain effectiveness.

    It is also advisable to replace the charcoal, sand, and gravel layers periodically, depending on usage levels. This renewal process is essential for maintaining optimal filtration capabilities. When replacing materials, ensure that all new components are clean and free from contaminants to avoid compromising the purification process.

    Regular maintenance not only extends the lifespan of your homemade water purifiers but also ensures that you consistently receive safe drinking water. Establishing a routine cleaning schedule can help you stay on top of necessary upkeep and ensure your systems are functioning as intended.

    Adhering to Safety Precautions During Operation

    When utilizing homemade water purifiers, it is crucial to observe safety precautions to prevent contamination and guarantee optimal system performance. Recognizing potential risks associated with improper use can protect the quality of the water you consume, safeguarding health.

    Always begin with clean water sources. While your filter may effectively remove contaminants, starting with polluted water can overwhelm the system and reduce its effectiveness. If possible, pre-filter heavily contaminated water through a cloth to reduce the load on your purification system before it is filtered.

    After filtration, store the clean water in sanitized containers to prevent any risk of recontamination. Ensure that the storage vessels are free from residual chemicals or contaminants, which could compromise the purity of the filtered water. Being vigilant about cleanliness and hygiene during the purification process can significantly impact the quality of the water you receive, ensuring that your homemade water purifiers operate effectively and fulfill their intended purpose.

    Troubleshooting Common Issues with Your Purification System

    Even the most effective homemade water purifiers can encounter problems that may hinder their functionality. Knowing how to troubleshoot common issues can help you maintain efficient water purification systems, ensuring consistent output quality.

    If you notice that the water flow is significantly slower than usual, this could indicate that the filter is clogged. Cleaning or replacing the affected layers, especially if the charcoal or sand has become saturated, can often resolve this issue and restore functionality to your purification system.

    Another frequent problem is the presence of an unusual taste or odor in the filtered water. This may signal that the activated charcoal is no longer effective and requires replacement. It is essential to monitor your filter’s performance regularly to identify these issues early, ensuring that your water remains safe for consumption and free from unpleasant characteristics.

    Learning to identify and rectify common problems can enhance your experience with homemade water purifiers, allowing you to achieve the best possible results from your purification efforts and ensuring safe drinking water for you and your family.

    Conducting Scheduled Maintenance Checks on Your Purifiers

    Performing scheduled maintenance checks on your homemade water purifiers is vital for ensuring that all components are functioning properly. Establishing a regular inspection schedule can help you identify and address any problems before they escalate into significant issues, ensuring consistent water quality.

    During maintenance checks, examine each layer of your filtration system for signs of wear and tear. Look for indications of clogging, discoloration, or any unusual odors that may suggest contamination. Regular assessments of the container’s integrity and any seals are also crucial in preventing leaks and ensuring the effectiveness of your purification system.

    In addition to physical inspections, consider periodically testing the quality of the purified water. Simple at-home testing kits can help you verify that your purification system is effectively removing contaminants. These proactive steps will help you maintain a reliable source of clean drinking water, empowering you to depend on your homemade water purifiers with confidence.

    Testing and Ensuring Water Quality for Safety and Health

    Ensuring the quality of your water is of paramount importance when utilizing homemade water purifiers. This section will explore straightforward testing methods to validate the effectiveness of your purification systems and advise when it may be necessary to seek professional assistance for comprehensive analysis.

    Simple At-Home Techniques for Testing Water Quality

    Testing your purified water at home is a simple process that can provide peace of mind regarding its safety and potability. Several straightforward methods can help you effectively assess the quality of your drinking water, ensuring that it meets safety standards.

    One of the most accessible methods involves using test strips, which can detect the presence of various contaminants, including bacteria, chlorine, and pH levels. These strips provide instant results, helping you gauge the effectiveness of your homemade water purifiers in removing harmful substances and ensuring safety for consumption.

    Another approach is conducting a simple jar test. Fill a clear jar with the filtered water and allow it to sit for several hours. Observe the water for cloudiness, unusual odors, or sediment accumulation. If any of these signs are present, it may indicate that the purification process requires reassessment or modification to improve performance.

    Regularly testing the water not only helps to ensure that your purification efforts are successful but also builds confidence in the safety of the drinking water you provide to your family and community, reinforcing the importance of water quality.

    Understanding and Analyzing Test Results for Informed Actions

    Interpreting water test results is a critical skill that enables you to take appropriate action if contaminants are detected. Understanding the significance of different readings can inform your decisions regarding water safety and purification methods, ensuring the well-being of your household.

    For instance, if test strips indicate high levels of bacteria, it is crucial to take immediate action, such as re-filtering the water or using chemical disinfectants to ensure safety. Similarly, if readings indicate excessive chlorine levels, you may need to adjust your filtration method or modify the materials used in your homemade water purifiers to enhance performance and ensure clean drinking water.

    Understanding pH levels is also vital for water safety. Excessively acidic or alkaline water can pose health risks and may indicate the presence of specific contaminants that require further attention. Regularly interpreting test results empowers you to make informed choices and maintain water safety for yourself and your loved ones, contributing to overall health.

    In instances where test results consistently indicate contamination levels beyond acceptable limits, it may be necessary to consider more advanced purification methods or seek professional analysis to address the issue effectively, ensuring the safety of your drinking water.

    When to Seek Professional Testing for Comprehensive Water Quality Analysis

    While at-home testing methods are valuable, there are times when professional testing becomes essential. Knowing when to seek expert analysis can prevent health risks associated with contaminated water and ensure safety for you and your family.

    If your home water supply frequently exhibits signs of contamination, such as persistent odors or unusual colors, professional testing can provide a comprehensive assessment of water quality. Home kits may not detect all contaminants, particularly heavy metals or chemical pollutants, which require advanced laboratory analysis for accurate detection and effective remediation.

    Additionally, if you are uncertain about interpreting test results or the necessary actions to take following detection, consulting a professional can provide clarity and guidance. Experts can offer tailored solutions to enhance water quality and ensure the safety of you and your family, safeguarding health and well-being.

    Taking proactive measures regarding water testing not only enhances the effectiveness of your homemade water purifiers but also contributes to the overall health and safety of you and your loved ones, fostering a culture of water safety awareness.

    Evaluating the Benefits and Limitations of Homemade Water Purifiers

    Understanding the advantages and limitations of homemade water purifiers is vital for making informed decisions regarding water purification methods. This section explores the benefits of DIY solutions as well as scenarios in which commercial alternatives may be more suitable for ensuring water safety.

    The Benefits of Crafting Your Own Water Purifiers

    One of the most significant benefits of homemade water purifiers is their cost-effectiveness. Many materials necessary for construction are inexpensive or readily available at home, enabling individuals to purify water without incurring the high costs associated with commercial systems, which can often be prohibitive.

    Additionally, DIY purifiers can be customized to cater to specific needs and circumstances. Whether tailored to local water quality issues or designed for portability during outdoor adventures, homemade systems offer flexibility that commercial options may lack, empowering users to adapt to their unique situations.

    Creating your purification system also fosters a greater understanding of water quality issues. This awareness can empower individuals to take control of their water safety, particularly in regions where clean drinking water is scarce or unreliable. Successful DIY projects can enable communities to thrive and enhance overall health and well-being by ensuring access to safe water.

    Moreover, homemade purifiers typically involve fewer chemicals and synthetic materials, making them an environmentally friendly choice. In areas where pollution and waste are significant concerns, opting for DIY solutions contributes to sustainability efforts and promotes more effective water management practices, aligning with global initiatives for environmental preservation.

    Recognizing the Limitations of DIY Water Purifiers and When to Consider Alternatives

    Despite their advantages, homemade water purifiers have limitations that must be acknowledged. One primary challenge is their potential inability to remove all contaminants. While DIY systems can effectively manage common pollutants, certain heavy metals and chemical contaminants may remain undetected, necessitating more advanced filtration technologies for comprehensive treatment.

    Another important factor is the time and effort required to construct and maintain these systems. Individuals without access to materials or those living in emergency situations may struggle to assemble effective purification systems quickly. In such instances, having access to commercial options may be crucial, especially when immediate access to clean water is required for survival.

    Additionally, the effectiveness of DIY systems can vary based on environmental conditions, such as temperature and sunlight availability. When traveling to remote areas or during adverse weather conditions, relying solely on homemade purifiers may not always guarantee safe drinking water, making it imperative to have backup solutions in place to ensure water safety under all circumstances.

    Understanding these limitations can help individuals make informed decisions about their water purification strategies. It may be beneficial to combine homemade methods with commercial solutions, particularly in situations where water quality poses immediate risks to health and safety, ensuring comprehensive protection.

    Enhancing Water Purification with Additional Strategies and Techniques

    To maximize the effectiveness of your homemade water purifiers, consider augmenting purification efforts with additional strategies. These may include utilizing advanced filtration materials, chemical disinfectants, or integrating multiple purification methods for comprehensive safety.

    Incorporating UV light sterilizers into your purification system can provide an extra layer of protection, particularly for microbial contaminants. These devices can be used in conjunction with DIY filters to enhance the overall purification process, ensuring that all potential contaminants are effectively eliminated.

    Another option is to utilize ceramic filters, which are capable of removing bacteria and sediments more effectively than traditional materials. Although these filters may be more expensive than sand and charcoal, investing in a ceramic filter can significantly boost the reliability of your homemade systems, guaranteeing safe drinking water for you and your family.

    Lastly, understanding and implementing community-wide water safety initiatives can enhance the effectiveness of individual homemade water purifiers. Shared knowledge and resources can lead to more comprehensive strategies for tackling water quality issues on a larger scale, ultimately benefiting the community as a whole and fostering a culture of water safety.

    Addressing Common Questions about Homemade Water Purification

    What materials do I need to build a homemade water purifier?

    To construct a homemade water purifier, you will need materials such as sand, gravel, activated charcoal, a container, and possibly cloth or coffee filters. These components work together to effectively filter and purify water for safe consumption, ensuring quality and safety.

    How effective are homemade water purifiers in removing contaminants?

    Homemade water purifiers can effectively eliminate many common contaminants, including sediments and bacteria. However, they may not remove heavy metals or certain chemicals, so additional measures may be necessary for complete purification, particularly in contaminated water sources.

    Can bleach be used to disinfect water in my homemade purifier?

    Yes, unscented household bleach can be utilized to disinfect water. It’s essential to follow proper guidelines for dilution and contact time to ensure that the water is safe to drink after treatment, effectively eliminating pathogens.

    How often should I clean and replace materials in my water purifier?

    Regular cleaning and replacement of materials are crucial for effective purification. It is recommended to check and clean your system monthly and to replace filters and components every few months, depending on usage, to ensure optimal performance.

    What are solar water disinfection methods?

    Solar water disinfection methods leverage sunlight to kill pathogens in water. By placing clear bottles filled with water in direct sunlight for several hours, UV rays effectively reduce the presence of harmful microorganisms, making the water safe for drinking.

    How can I test the quality of water from my homemade purifier?

    You can assess the quality of water using at-home test strips that detect contaminants such as bacteria and chlorine. Observing water clarity and odor can also provide initial indicators of water quality and safety, ensuring it meets health standards.

    When should I seek professional testing for my water?

    If you consistently detect contamination in your water or suspect the presence of heavy metals, it is advisable to seek professional testing. Experts can provide accurate assessments and tailored solutions to improve water quality and ensure safety for you and your family.

    Are homemade water purifiers suitable for emergencies?

    Yes, homemade water purifiers can be extremely effective in emergencies, providing a cost-effective and accessible means of ensuring safe drinking water when commercial options are unavailable or impractical in critical situations.

    Can I combine different purification methods for better results?

    Absolutely! Combining methods such as filtration, chemical disinfection, and solar disinfection can enhance the effectiveness of your homemade water purifiers, providing comprehensive solutions for water safety and quality assurance, ensuring safe drinking water.

    What should I do if my homemade purifier fails to produce clean water?

    If your homemade purifier fails to deliver clean water, check for clogs or saturation in the filtration materials. Regular maintenance and replacement of components are essential. You may also need to reassess your purification method to improve its effectiveness and ensure safe drinking water.

    Explore our world on X!

    The post Homemade Water Purifiers: Essential DIY Solutions appeared first on Survival Bite.

    The Article DIY Solutions for Homemade Water Purifiers Was Found On https://limitsofstrategy.com

  • How To Fix Low Water Pressure In Your Taps

    How To Fix Low Water Pressure In Your Taps

    Understanding Low Water Pressure

    When you turn on the faucet and notice a weak flow of water, it can be frustrating. Understanding the reasons behind low water pressure is the first step towards resolving the issue. Let’s explore the common causes and the impact of low water pressure.


    Common Causes of Low Water Pressure

    Low water pressure can be attributed to various factors, including:

    1. Clogged pipes: Over time, mineral deposits, rust, and debris can accumulate inside the pipes, restricting water flow. This is especially common in older plumbing systems.
    2. Water leaks: Undetected leaks in the pipes can lead to a decrease in water pressure. Leaks can occur at any point in the plumbing system and should be addressed promptly.
    3. Faulty pressure regulator: The pressure regulator controls water flow into your home. If it malfunctions or becomes damaged, it can result in low water pressure.
    4. Municipal supply issues: Sometimes, low water pressure may be due to temporary issues with the municipal water supply. This can be caused by maintenance work, increased demand, or issues in the distribution system.
    5. Blockages in fixtures: Faucet aerators and showerheads can accumulate mineral deposits over time, reducing water flow. Cleaning or replacing these fixtures can help restore water pressure.


    Impact of Low Water Pressure

    Low water pressure can have a significant impact on your daily activities. It can:

    • Affect shower experience: Inadequate water pressure can make it challenging to rinse off shampoo and soap effectively, resulting in a less satisfying shower experience.
    • Decrease efficiency in cleaning: With low water pressure, it can be difficult to effectively clean dishes, clothes, and other items that require a strong flow of water.
    • Delay filling containers: Filling large containers, such as pots for cooking or buckets for cleaning, takes longer when water pressure is low.
    • Cause inconvenience: From flushing toilets to running the dishwasher, low water pressure can cause delays and inconvenience in various household tasks.

    By understanding the common causes of low water pressure and the impact it can have, you can take appropriate steps to address the issue. In the next section, we will explore troubleshooting techniques and DIY solutions to help improve water pressure.

    Troubleshooting Low Water Pressure

    Experiencing low water pressure in your faucet can be frustrating, but there are several troubleshooting steps you can take to identify and resolve the issue. In this section, we will explore two important steps: checking for water pressure issues and identifying potential blockages.

    Checking for Water Pressure Issues

    Before diving into potential causes, it’s essential to determine if the low water pressure issue is limited to a specific faucet or affects multiple fixtures in your home. Start by turning on different faucets, such as those in the kitchen, bathroom, and outdoor areas, to assess if the problem is widespread. This will help you determine if the issue is isolated to a single faucet or a broader plumbing concern.

    If the low water pressure is only present in one faucet, it’s likely that the problem lies within that specific fixture. However, if multiple faucets are affected, the issue may be related to the overall water supply or plumbing system in your home. In such cases, it may be necessary to contact a professional plumber to assess the situation.

    Identifying Potential Blockages

    Blockages within the plumbing system can contribute to low water pressure. Mineral deposits, such as limescale and rust, can accumulate over time and restrict the flow of water through the pipes and faucets. To identify if blockages are causing the low water pressure, consider the following steps:

    1. Inspect faucet aerators: Faucet aerators, located at the tip of the faucet, can become clogged with mineral deposits. Unscrew the aerator and clean it thoroughly, removing any debris or deposits. This simple step can often restore water pressure in the affected faucet.
    2. Check for pipe blockages: If cleaning the aerator doesn’t resolve the issue, there may be blockages deeper within the plumbing system. Contact a professional plumber who can assess the pipes for any obstructions. They may use specialized tools or techniques to remove the blockages and restore proper water flow.

    By troubleshooting low water pressure through these steps, you can determine if the issue is isolated or requires professional intervention. Remember, regular maintenance and addressing any blockages promptly can help prevent future occurrences of low water pressure.

    DIY Solutions for Low Water Pressure

    Experiencing low water pressure in your faucet can be frustrating, but there are several do-it-yourself (DIY) solutions you can try before calling a plumber. In this section, we will explore two common DIY solutions for low water pressure: cleaning faucet aerators and removing mineral build-up in pipes.

    Cleaning Faucet Aerators

    One of the most common causes of low water pressure in faucets is a clogged or dirty faucet aerator. Over time, mineral deposits, sediment, and debris can accumulate in the aerator, obstructing the flow of water. Cleaning the aerator is a simple and effective way to restore water pressure.

    To clean the aerator, follow these steps:

    1. Start by turning off the water supply to the faucet.
    2. Unscrew the aerator from the faucet spout. Use a pair of pliers if it’s difficult to remove by hand.
    3. Carefully disassemble the aerator, taking note of the order of the parts.
    4. Rinse each component under running water to remove any loose debris.
    5. Soak the aerator parts in vinegar for about 30 minutes to dissolve mineral deposits. Alternatively, you can use a lime scale cleaner if the build-up is severe.
    6. Use a small brush, like a toothbrush, to scrub away any remaining deposits.
    7. Rinse all the parts thoroughly with water to remove any residue.
    8. Reassemble the aerator and screw it back onto the faucet spout.
    9. Turn on the water supply and check if the water pressure has improved.

    Cleaning the faucet aerator is a simple and cost-effective solution that can often resolve low water pressure issues. If you’re still experiencing low water pressure after cleaning the aerator, it may be necessary to explore other potential causes and solutions.

    Removing Mineral Build-up in Pipes

    Mineral build-up in pipes is another common cause of low water pressure. Over time, minerals like calcium and magnesium can accumulate in the pipes, reducing the flow of water. Removing this build-up can help restore optimal water pressure.

    To remove mineral build-up in pipes, you can try the following steps:

    1. Turn off the water supply to your house.
    2. Open all the faucets in your home to drain any remaining water from the pipes.
    3. Locate the affected pipes. They are typically found near the water heater or in areas with hard water.
    4. Use a pipe wrench or pliers to disconnect the affected pipe sections.
    5. Soak the pipes in a solution of vinegar and water for several hours. The vinegar will help dissolve the mineral deposits.
    6. After soaking, scrub the pipes with a brush to remove any remaining build-up.
    7. Rinse the pipes thoroughly with water to remove any residue.
    8. Reconnect the pipes and turn on the water supply.
    9. Check if the water pressure has improved.

    Removing mineral build-up in pipes can be a more involved process, and if you’re unsure or uncomfortable doing it yourself, it’s best to consult a professional plumber. They can assess the situation and provide the necessary expertise to resolve the low water pressure issue.

    By cleaning faucet aerators and removing mineral build-up in pipes, you can often resolve low water pressure problems without the need for a plumber. However, if these DIY solutions do not improve the water pressure, it may be time to call a professional for a more comprehensive assessment.

    When to Call a Plumber

    drainage plumberIn some cases, low water pressure issues may require the expertise of a professional plumber. If you’ve tried troubleshooting low water pressure on your own without success, it may be time to call in the experts. Here are two scenarios in which it is advisable to seek the assistance of a plumber: professional assessment and fixing hidden plumbing issues.

    Professional Assessment

    If you’ve exhausted all your DIY troubleshooting options and are still experiencing low water pressure, it’s a good idea to have a plumber assess the situation. A professional plumber will have the knowledge and tools to conduct a thorough evaluation of your plumbing system. They will be able to identify any underlying causes or hidden issues that may be contributing to the low water pressure.

    During a professional assessment, the plumber will examine various components of your plumbing system, including the main water supply line, pipes, valves, and fixtures. They may also perform water pressure tests to determine the exact cause of the problem. Based on their findings, they will provide you with a detailed report and recommend the necessary steps to resolve the low water pressure issue.

    Fixing Hidden Plumbing Issues

    Low water pressure can sometimes be caused by hidden plumbing issues that are not easily identifiable to the untrained eye. These issues may include pipe leaks, obstructions, or deteriorated pipes. Fixing such hidden plumbing issues requires specialized skills and tools that a professional plumber possesses.

    Upon identifying the hidden plumbing issues, the plumber will develop a plan to address and fix them. This may involve repairing or replacing damaged pipes, removing obstructions, or making adjustments to the plumbing system. By addressing these hidden issues, the plumber can help restore optimal water pressure throughout your home.

    If you’re experiencing low water pressure and suspect that the underlying causes are beyond your DIY capabilities, it’s recommended to call a plumber for a professional assessment. They have the expertise to identify and address hidden plumbing issues that may be contributing to the problem. Remember, timely intervention by a plumber can help prevent further damage to your plumbing system and ensure the restoration of adequate water pressure.


    Upgrading Water Pressure

    If you’ve tried troubleshooting and DIY solutions but still find yourself dealing with persistently low water pressure, it may be time to consider upgrading your water pressure system. Two common options for improving water pressure are installing a pressure booster pump and upgrading your plumbing system.

    Installing a Pressure Booster Pump

    A pressure booster pump is a device designed to increase water pressure throughout your plumbing system. It works by mechanically boosting the water flow, ensuring that it reaches your faucets and fixtures with greater force. This can be particularly beneficial if your water supply is located at a lower elevation or if you have a large house with multiple floors.

    Pressure booster pumps are typically installed near the water source, such as in the basement or utility room. They are connected to the main water line and use a motor to increase the pressure of the water flowing through the system. It’s important to consult a professional plumber to ensure the correct installation and proper sizing of the pump for your specific needs.

    Upgrading Plumbing System

    Another option to consider when upgrading water pressure is to assess and upgrade your plumbing system. Over time, old pipes can become corroded or clogged with mineral deposits, leading to reduced water flow and pressure. Upgrading your plumbing system involves replacing old pipes with newer, wider pipes that allow for better water flow.

    The size of the pipes plays a crucial role in maintaining adequate water pressure. Larger pipes provide less resistance to water flow, allowing it to move more freely and reach your faucets with greater force. Upgrading your plumbing system may involve replacing sections of pipe or, in some cases, the entire system. A professional plumber can assess your current plumbing setup and recommend the best course of action to improve water pressure.

    By considering these upgrading water pressure options, you can potentially resolve low water pressure issues in your home. Whether it’s installing a pressure booster pump or upgrading your plumbing system, consulting a professional plumber is essential to ensure proper installation and optimal performance. Remember, maintaining optimal water pressure is crucial for a smooth and efficient water supply throughout your home.


    Maintaining Optimal Water Pressure

    To ensure that you maintain optimal water pressure in your faucet, it’s important to follow regular maintenance tips and take preventive measures to avoid low water pressure issues.

    Regular Maintenance Tips

    1. Clean Faucet Aerators: Over time, mineral deposits and debris can accumulate in the aerators of your faucets, leading to reduced water flow and low water pressure. Regularly clean the aerators by unscrewing them from the faucet spout and rinsing them thoroughly. This will help remove any build-up and restore the flow of water.
    2. Check for Leaks: Even small leaks in your plumbing system can contribute to low water pressure. Inspect all faucets, pipes, and fittings for any signs of leaks and repair them promptly. Leaks not only waste water but can also affect the overall water pressure in your home.
    3. Inspect Pipes: Periodically check the condition of your pipes, especially older ones. Corroded or damaged pipes can restrict the flow of water and cause low water pressure. If you notice any signs of deterioration, it’s best to consult a professional plumber to assess and replace the affected pipes.
    4. Ensure Proper Ventilation: Adequate ventilation in your plumbing system is essential for maintaining optimal water pressure. Make sure that the vents and air chambers in your plumbing system are clear of any obstructions. Blocked vents can lead to pressure imbalances and subsequently affect the water pressure.

    Prevention of Low Water Pressure Issues

    1. Avoid Clogs: Clogs in your plumbing system can significantly impact water pressure. To prevent clogs from occurring, be mindful of what you flush down toilets and drain in sinks. Avoid disposing of items that can cause blockages, such as grease, hair, or large food particles.
    2. Monitor Water Pressure: Regularly check the water pressure in your home using a pressure gauge. This will allow you to identify any significant changes in water pressure early on. If you notice a sudden drop in water pressure, it may indicate an underlying issue that requires attention from a professional plumber.
    3. Schedule Professional Maintenance: While regular maintenance tasks can help prevent low water pressure, it’s recommended to schedule professional maintenance at least once a year. A professional plumber can inspect your plumbing system, identify potential issues, and perform necessary repairs or upgrades to ensure optimal water pressure.

    By following these maintenance tips and taking preventive measures, you can help maintain optimal water pressure in your faucet. If you experience persistent low water pressure despite these efforts, it’s advisable to consult a professional plumber to diagnose and address any underlying plumbing issues.
    See more for Downie Plumbing and Gas


    The Article How To Fix Low Water Pressure In Your Taps First Appeared ON
    : https://ad4sc.com